Using post formats
Avid supports 6 post formats, selectable from the Edit Post screen: Gallery, Image, Video, Standard (text), Quote, and Link. Whenever you create a new post, choose an appropriate post format and follow the instructions below.
If you need a hand, email support[at]thethemefoundry[dot]com.
Posting galleries
- Navigate to Posts → Add New.
- Choose Gallery in the Format metabox. This will change the post from a regular blog post into a gallery.
- Optionally add a gallery title and description using the title field and WordPress editor, respectively.
- To add your gallery to the page, begin by clicking the Add Media button.
- Go to Create Gallery and either upload new photos or choose existing photos.
- When you have chosen and ordered your images, click Create gallery, then Insert gallery.
- Set a “Featured Image” by clicking the Set featured image link. This will be used as the thumbnail to represent the gallery throughout different pages on the site.
- Save your post.
To change the order of your images in the slideshow:
- Hover over the gallery embedded in your post.
- Click the image icon that appears upon hovering.
- In the Edit Gallery screen, drag and drop images to change the order.
- You can also add, edit, and delete images in this screen.
- Click Update Gallery.
- Save the post.
Posting images
To publish a single highlighted image, select Image as your post format. Then, set the Featured Image of your post to the image you want to highlight in the Featured Image metabox on the bottom right of the screen.

The Featured Image will be included at the top of the post.
Posting videos
To publish a video, first select Video from the post format box.
WordPress supports auto-embedding for many video providers. If your video hosting service is on this list of providers, then you only need to insert the URL for your video into the content area. An example from YouTube would be:
http://www.youtube.com/watch?v=mc0vhSseGk4
If your video provider is not found in the above list, you can still embed your video using HTML embed codes. Embed codes are typically provided by video hosts (look for a “Share” or “Embed” button to get the code). Once you have the code, make sure you are using the HTML editor, and paste your embed code into the post content area. The video should now display.
Posting articles
Articles are regular WordPress posts: leave the post format set to Standard and create your post.
Posting quotes
Select Quote from the post format box and type or paste your quote into the post content editor. Your quote will now display using Avid’s custom Quote post format styling. The post title will not display in the timeline view — only the quoted text you enter will be shown.
To add a citation, select your text in the visual editor and click the “cite” button, which is available in your advanced editor buttons. See the styling overview section for more details on Avid’s style buttons.
Posting links
Select Link from the post format box and type your link text into the post content editor. Next, highlight the text you just entered, and create your link by clicking the link icon in the editor. The post title will be ignored; only the linked text you entered will be shown.
Styling your posts
Avid adds a set of buttons to the visual editor; these buttons allow you to easily format your content with Avid’s custom typographic elements. To view these extra buttons, make sure you’ve enabled the “Kitchen Sink” option on the visual editor.

Stylistic elements include:
- Horizontal rulers
- Leading text
- Citations
- Various alerts – regular, success, error and note
Using page templates
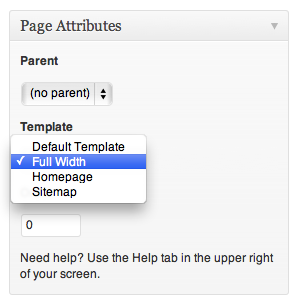
Avid has four available page layouts, including the Default, Full width, Homepage, and Sitemap templates.
Creating pages
In your WordPress dashboard, navigate to Pages → Add New and select one of the four templates available from the Template drop-down; your content will be formatted accordingly.
Full width pages
By default, your pages will include a sidebar (configureable on the Appearance → Widgets screen). If you want a page without a sidebar, choose the “Full width” page template.
Homepage
The Homepage template can be used as an alternative to the timeline view for your front page. The Homepage template includes a large featured slider above a smaller content area.
Adding posts to the homepage slider
To add a post to the homepage slider, follow these steps:
- On your admin dashboard, go to Posts → All Posts;
- Click Edit to get to the Edit Post screen for the post you want to add to the slider;
- Find the Avid Theme Post Options meta box:

- Check the Show in featured slider box;
- Set a featured image for your post;
- Click Publish or Update, and you’re done.
Sitemap page
To create a Sitemap, you will need to use the Sitemap page template.
- Navigate to Pages → Add New;
- Enter a title for your page (Sitemap, for example);
- Under Page Attributes, select the Sitemap template;
- Click Publish.
The Sitemap page will be automatically generated; no need to write a single word.
Gallery page
The Gallery/Images page is auto-generated. It uses your Gallery posts (and the images attached to them) to produce a special view for readers to browse your galleries.
At the top of the page are two buttons used to toggle between the Galleries and Images views.

The Galleries view is similar to the blog/timeline view — your gallery posts are ordered by publish date.
The Images view is a unique display of all images attached to your gallery posts. Only images selected for a gallery will appear in the Images view. Clicking any individual image will take you to a larger version of the image.
Adding the Gallery page to a menu
Since the Gallery/Images page is auto-generated, adding it to your menu is slightly different than a typical page. You will first need to take manual control over your menus. If you are not familiar with doing so, please watch this short video on WordPress menus to understand how to manually set up your menus.
Once you’re familiar with setting up menus, head to the Appearance → Menus screen. The instructions for adding the Gallery/Images page vary depending on your WordPress version.
WordPress 3.4 and newer
On the Appearance → Menus screen look for the “Format” meta box.
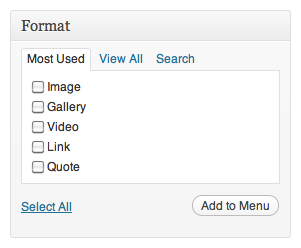
Check the Gallery format and click “Add to menu”. Finally, save your menu by pressing the “Save Menu” button.
WordPress 3.3.3 and older
On the Appearance → Menus screen look for the “Custom Links” meta box.
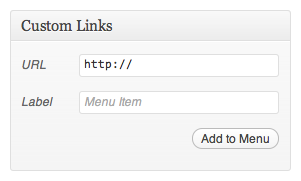
- Add your label text (this will be the text that appears in the menu)
- Set the URL to be
http://www.yoursite.com/?post_format=gallery, replacingwww.yoursite.comwith your home page URL. - Click “Add to menu”.
- Finally, save your menu by pressing the “Save Menu” button.## Theme options
Options
Display options
Avid allows you to easily remove the author’s name, post navigation, post date, tags and categories from the post display. In your WordPress dashboard, navigate to the Appearance → Theme Options page. Under the “Display options” section, check the appropriate options to prevent them from displaying on all posts and pages.
Within the “Display options” section, you can also:
- Toggle on or off a search bar at the top of your blog page.
- Remove gallery and image posts from your blog page.
Background image
Avid features a semi-transparent background image that overlays the background pattern your site. Avid comes with 3 choices for background images, which you can select on the “Background options” section of your Theme Options page.
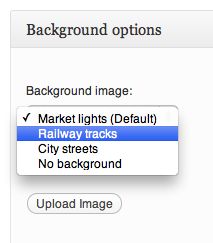
You also have the option to upload your own semi-transparent background image. If you choose this option, the default background image will be hidden.
Subscribe links
Sharing buttons are controlled under the “Subscribe links & copyright” section of the Appearance → Theme Options page. To disable all footer icons (including RSS), check “Disable all icons”.
Footer byline
Under the “Subscribe links & copyright” section of the Appearance → Theme Options page, you will find the input field for your footer Credit line text. By default, this field is left empty.
Miscellaneous
Adding a slideshow to posts and pages
To enable a slideshow on a page or non-gallery post, add your gallery; then, paste the following shortcode into your page content, replacing the default [gallery] shortcode:
[gallery slider="true"]
Using the regular [gallery] shortcode will remove the slider styling and return to the default WordPress gallery.
Enable gallery autostart
To autostart a slideshow within a page or non-gallery post, include autostart="true" into the shortcode, like so:
[gallery autostart="true" slider="true"]
Avid Theme Recent Posts widget
The Avid Theme Recent Posts widget is featured in the footer of the demo site. This is not a standard WordPress widget; it is a feature of Avid. This widget can be added to anywhere in your footer or sidebar, but it was originally designed to be in the Right Footer of your theme. The widget displays the title and a brief text-only excerpt of your 2 most recent posts.
Regenerate thumbnails plugin
Avid contains a number of different images shapes and sizes. If you are migrating an existing site to Avid, you may notice that many of your images do not look quite right. This is due to the way WordPress generates the various image sizes a theme needs. To regenerate image sizes for preexisting images, we recommend the Regenerate Thumbnails plugin.
Install and activate the plugin, go to the Tools → Regen. Thumbnails screen on your admin panel, and click the Regenerate All Thumbnails button. Your images will have the proper sizes generated for use with Avid.
Sharpen resized images plugin
The Avid demo site made use of the Sharpen Resized Images plugin, and if you install this plugin Avid will make a small modification to improve image sharpness.
Image dimensions
Where a height is not provided, feel free to use any value.
Homepage slider, image post format, and gallery images:
- Width: 1140px
- Height: 700px
To support high resolution devices:
- Width: 2280px
- Height: 1400px
Timeline featured images
- Width: 863px
- Height: 521px
To support high resolution devices:
- Width: 1726px
- Height: 1042px
Standard (with sidebar) page content area:
- Width: 788px
Full width page content area:
- Width: 1140px
Using portrait photos in galleries
The timeline and gallery views crop your gallery’s featured image to a landscape aspect ratio – specifically, 863px by 521px. If you have a gallery of portrait-orientation (tall) images, the featured image may not look very good when cropped to these dimensions.
However, there is a workaround that can allow you to set a featured image for a gallery without including the featured image in the gallery itself.
First, create your gallery using the instructions above, stopping after step #2 (saving your changes). Then, instead of selecting a featured image from the images you just uploaded, go to the Media → Add New screen:
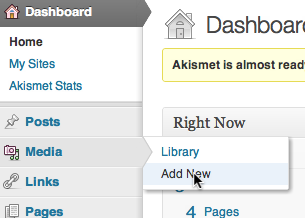
Here, you’ll upload an image that fits the aspect ratio for the featured image a little better – you can crop the image beforehand using an image edit program. Since you’re uploading this image separately from the gallery, it will not be included in the slideshow.
After your image has been uploaded through the Media → Add New screen, follow these steps:
- Back on the Edit Post screen for your gallery post, and click set featured image;
- Switch to the Media Library;
- From the drop-down menu, select Uploaded to this page;
Then, select the image you just uploaded, and click Use as featured image.
After completing these steps, your portrait gallery should have a featured image that works with Avid’s dimensions.
Advanced: Featured image cropping modification
If you are comfortable making PHP modifications to your child theme’s functions.php file, you can also have a look at the code outlined in this support topic, which will change the way WordPress crops portrait-orientation photos to use the upper half (instead of the center) when cropping.
Make sure to read about replacing theme functions if you’re unfamiliar with the process.
