Setting up your theme
- Creating a homepage
- Creating your Gallery page
- Creating individual galleries
- Removing images from galleries or the homepage
- Using private galleries (great for clients)
- Using Flickr sets for galleries
- Selling individual photos
- Ordering images within galleries
- Image dimensions
Advanced setup
Writing blog posts
Using the Theme Options Menu
Creating a homepage
- Add a new empty page called “Home” and choose the “Homepage” template.
- Add images to your homepage using the Add Media button. From the drop down menu choose Uploaded to this page. Add your homepage images. Once your images have uploaded you can change their order by dragging them around the editor. When you have finished, close the editor by click the “X” in the upper right hand corner. Note: images will automatically be cropped to 948 x 534 to fit the size of the frame. If you want to avoid cropping, upload them at that exact size.
- Create a new page titled “Blog”, leave it empty, and publish it.
- Navigate to Settings → Reading.
- Choose “A static page” from the “Front page displays” option.
- Set the Front page to “Home” and the Posts page to “Blog”.
Creating your Gallery page
- Add a new empty page named “Gallery” (or whatever you want to name your gallery page) and choose the “Gallery” page template.
- Add your new page to your menu under Appearance → Menus.
Creating individual galleries
- Navigate to Galleries → Add New
- Give the Gallery a title and description (will appear below the Gallery unless manually disabled).
- To upload your images, click the Add Media button. From the drop down menu choose Uploaded to this post. Add your images for this gallery. Once your images have uploaded you can change their order by dragging them around the editor. When you have finished, close the editor by click the “X” in the upper right hand corner. The images will be scaled to properly fit the gallery stage if they are too big. The dimensions of the stage are 960px x 540px. We recommend resizing all of your images down to a max height of 540px to save bandwidth and speed up the gallery. See Flickr section below if you prefer to use Flickr sets instead.
- Set a “Featured Image” by clicking the “Set featured image” link. This will be used as the thumbnail on your Gallery page.
- If you want to set the order in which the gallery is displayed on the main gallery index page specify an “Order” value inside the “Attributes” box.
Removing images from galleries or the homepage
Images are automatically linked to your gallery or homepage when you upload them, so to remove an image from a gallery or homepage, you need to delete it.
- Start by clicking on the “Add Media” button above the visual editor.
- From the drop down menu choose Uploaded to this page / post.
- Choose the image you want to delete and under “Attachment Details” click Delete Permanently, confirm the deletion, and the image will be removed from the gallery!
- Click the “X” in the top right to leave the editor. Make sure to update your page.
Gallery options
- Disable the Gallery title and description: This refers to the post content and Gallery title. If you check this option it will be hidden.
- Disable image descriptions: There is a small info icon that automatically shows up in the top left corner of each image. Set the image title and alt tag to display a title and description for each image, or check the box to disable the info icon.
- Enable image hard cropping to the stage size: Automatically crop all images to fit the size of the stage (default is 960px x 540px).
- Enable auto play: When this box is checked the gallery will start cycling through the images automatically.
- Set a custom gallery stage height (default is 540 pixels): Change the gallery stage height to better accommodate your photos. Be sure to include the number only (no px).
Using private galleries (great for clients)
- Create a new gallery and set the post Visibility to “Password protected”
- Copy the permalink, give it to your client (along with the password), and you are all set! Of course, password protected galleries do not show up on your main gallery page.
Using Flickr sets for galleries
- To use your Flickr galleries you first need a Flickr API key. (API setup instructions below)
- Navigate to Appearance → Photography Options and enter it along with your username.
- You will now see a list of your public photo sets to choose from on every gallery page.
Squished Flickr Thumbnails
If your thumbnail images appear “squished” in the gallery view you can override your Flickr thumbnail by setting a “featured image” for each gallery through WordPress. The image thumbnail size is 195×280. Simply create a thumbnail for each gallery of that size and upload it via the “featured image” option. If you prefer to upload the original images WordPress will “hard crop” the images to fit the thumbnail size. If you are unsure about setting the post thumbnail check out the video tutorial in the video library.
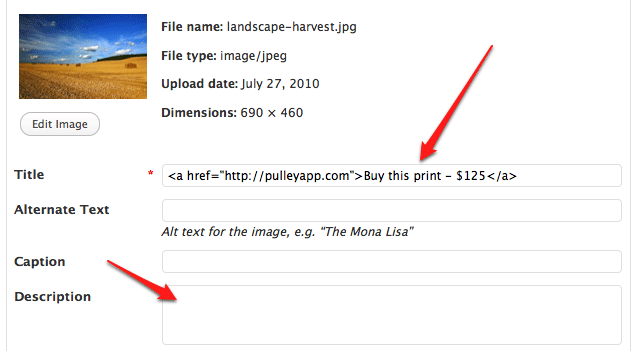
Selling individual photos
Photography does not have any integrated shopping cart or e-commerce features but you can still sell individual photos using PayPal or any shopping cart with a “buy it now” feature. We recommend trying Pulley App which generates a unique URL for each photo/product you want to sell.
After setting up a unique URL your customers will see a link to purchase the photo when they click the info button in the top left corner of an image.
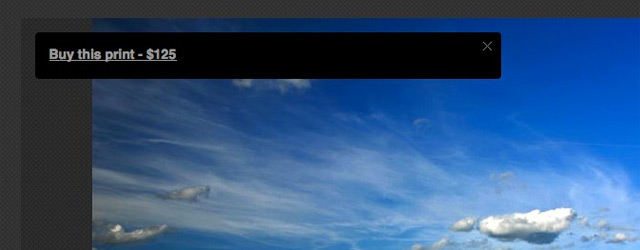
To setup a unique URL enter the code in the image title or description field.
Creating multiple Gallery pages
If you’d like to create multiple Gallery pages with each showcasing different galleries, you’ll need to do the following:
- Add a new empty page named “Gallery” (or whatever you want to name your gallery page), choose the “Gallery” page template, and save your page.
- Go to the Edit Gallery screen for the gallery you want to include.
- Get the ID of the Gallery: Look at the URL of the Edit page. It should look something like
http://www.yoursite.com/wp-admin/post.php?post=123&action=edit.post=123indicates the ID of your gallery (123 in this example). - Go back to the Edit screen for the “Gallery” Page you created in step 1
- Insert
[gallery id="123"](make sure to add quotes around the ID) into the content of the page. - Repeat 2-5 for all galleries you want to include, and you’ll have a custom Gallery page.
[gallery] shortcode, otherwise WordPress will ignore all shortcodes after the first.Ordering images within galleries
- Click the Add Media button;
- From the drop down menu, select Uploaded to this post from the drop down menu;
- Drag-and-drop your images into order;
- Close the Window.
Using featured images in blog posts
To use a featured image upload it to your blog post while on the post edit screen. You cannot re-use images from your gallery as a featured image in a blog post. Why? WordPress only allows you to “attach” an image to one post (a gallery is considered a post). You will have to re-upload the image if you want to use an image in your gallery as a featured image on a blog post.
- The featured image will sit above the title of your blog post on the blog index and single post view.
- The image will be auto-cropped by WordPress to a size of 628px x 250px. If you would prefer to crop it yourself, crop it before uploading.
Inserting images into your blog posts
Keep them below the more tag
The layout of the single post view differs slightly from the main “blog” index view. For this reason you want to be sure to place all your “in post” images below the “more tag”:http://en.support.wordpress.com/splitting-content/more-tag/. This will give you more room and keep your “blog” page clean (only featured) images.
Inserting images
Go to Settings → Media and set your thumbnail width to 628px (leave the height empty) and uncheck the “Crop thumbnails to exact dimensions” box:
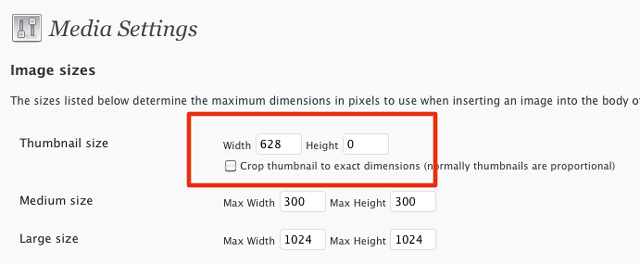
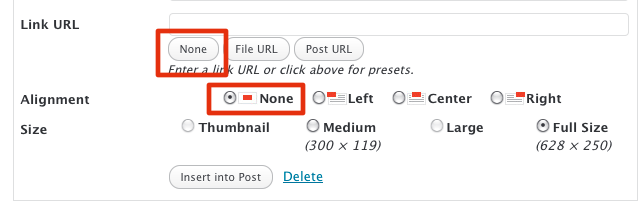
Now when you want to insert an image in your post (remember below the more tag!) simply use the WordPress media uploader tool and choose the “thumbnail” size (should be the default). I would recommend setting the link to “none” as well unless you want the images to be clickable.
You can also “recycle” images from your gallery in your blog posts. Instead of uploading a new image simply click the media library link in the top right of the uploader box. Click the image you want to add, click “none” for the link, and then click “Insert into post”.
Tip: Make sure “None” is selected in the alignment setting to make sure your images have proper spacing. If you are using smaller images and want to float them left or right then feel free to use that setting.
Flickr
The hardest part is setting up your API key.
- Go to the Apply for API key page.
- If you have not yet logged into your Flickr account, you will be asked to do so.
- Click on the link to create a new non-commercial API key
- Give your app a name (eg. My website name) and a description (eg. A Flickr gallery for my website.)
- Agree to the terms and click submit.
- You will presented with your API Key and API Secret.
Color Scheme
Photography comes with two built in color schemes. Dark (the default) and light.
Gallery page captions
You can choose a caption style for the Gallery page template. By default, captions are off. Selecting basic captions adds the gallery title below the gallery image. Selecting fancy captions makes the gallery title appear when you hover on a gallery image.
Subscribe Links
To enable your subscribe links, complete the following steps:
- Navigate to Appearance → Theme options;
- Under Subscribe links, check to enable your social links;
- Enter the full URL links to your social sites in the provided input fields. Note: For Twitter, only enter your Twitter ID.
Footer
You can add a custom copyright line to the footer of your site. To do this:
- Go to Appearance → Theme Options;
- Under Footer, enter your custom message;
- Click Save changes.
Image dimensions
Where a height is not provided, feel free to insert your own custom value.
Homepage slideshow image:
- Width: 948px
- Height: 534px
Individual gallery stage:
- Width: 960px
- Height: 540px
Gallery page thumbnail:
- Width: 280px
- Height: 195px
Blog post featured image:
- Width: 628px
- Height: 250px
Blog post image:
- Width: 548px