If you need a hand, email support[at]thethemefoundry[dot]com.
Note: If you are upgrading from Photography 1.x, please read Upgrading Photography 1.x to 2.0 before proceeding.
Additionally, if you are using a version of Photography less than 2.0, please view the documentation for Photography 1.x.
Minimum requirements
In order to take advantage of the latest improvements to WordPress, Photography 2.0 requires WordPress 3.4 or higher.
Creating a homepage
- Add a new empty page called “Home” and choose the “Homepage” template.
- Add images to your homepage using the Add Media button. Note: Images will automatically be cropped to 960 x 640 to fit the size of the frame. If you want to avoid cropping, upload them at that exact size.
- Go to Create Gallery and either upload new photos or choose existing photos.
- When you have chosen and ordered your images, click Create gallery, then Insert gallery.
- Once “Home” is set up to your satisfaction, click Publish.
- Create a new page titled “Blog”, leave it empty, and publish it.
- Navigate to Settings → Reading.
- Choose “A static page” from the “Front page displays” option.
- Set the Front page to “Home” and the Posts page to “Blog”.
You may use the Gallery page template for your homepage layout. Choose the “Gallery” page template instead of the “Homepage” template.
Creating a gallery page
Note: A Gallery Page is for showing a collection of individual galleries. You may want to go and create one or more individual galleries before following these steps.
- Add a new empty page named “Gallery” (or whatever you want to name your gallery page) and choose the “Gallery” page template.
- In the Gallery Page Options metabox, drag items from Available items to the Drag items here to add them to the page section. All video and gallery posts will be available for inclusion in your gallery.
- Sort items by dragging and dropping them into place.
- By default, the thumbnails on the Gallery page will display in landscape orientation. To change the orientation to portrait, choose Portrait in the Orientation metabox.
- Add your new page to your menu under Appearance → Menus.
- Repeat as needed to add additional Gallery pages.
The thumbnails on your Gallery page are pulled from the Featured Image for each individual gallery (see Creating individual galleries below).
Creating individual galleries
- Navigate to Posts → Add New.
- Choose Gallery in the Format metabox. This will change the post from a regular blog post into a gallery.
- Optionally add a gallery title and description using the title field and WordPress editor, respectively.
- To add your gallery to the page, begin by clicking the Add Media button.
- Go to Create Gallery and either upload new photos or choose existing photos.
- When you have chosen and ordered your images, click Create gallery, then Insert gallery.
- Set a “Featured Image” by clicking the Set featured image link. This will be used as the thumbnail on Gallery pages that include this gallery.
- Save your post.
For more detailed information about media management, be sure to view our “Add photos and images” and “Using the media library” video tutorials.
Setting a custom gallery stage height
Setting a custom gallery stage height allows you to control the height of the gallery display. This can be useful if you intend to use a gallery to display images that do not use a 3:2 aspect ratio.
- Locate the Stage Height metabox in the post editor screen at the bottom of the right hand column. Note that this metabox only shows if the “Gallery” option is selected in the Format metabox.
- Add a custom height in pixels.
- Save the post.
Tip: The value used for the stage height is divided by 960 to determine the aspect ratio. For example, if you wanted a 3:4 aspect ratio, you would want to enter “720” for the stage height.
Regenerating thumbnails
While this step is not absolutely necessary, it can help ensure that your photos will look amazing across the site. Photography relies on images of specific sizes for different template layouts. If you are installing Photography in an existing site, we recommend this step. If you are building a new site that has no existing images, you can skip this step as images will be resized when uploaded.
- Install the Regenerate Thumbnails plugin.
- Go to Tools → Regen. Thumbnails.
- Click the Regenerate All Thumbnails button.
- Resizing is completed when the “All done!” message appears.
Using private galleries
- Create a new gallery and set the post Visibility to “Password protected”.
- Copy the permalink and password, give these details to your client. Password protected galleries do not show up on your main gallery page.
Using Flickr sets for galleries
- To use your Flickr galleries, you first need a Flickr API Consumer Key and Consumer Secret. (API setup instructions below).
- You will see a list of all of your photo sets to choose from on every gallery post. You can choose from your public and private sets.
- Check the box next to Enable Flickr.
- Choose a Flickr set.
- Save the post.
Selling individual photos
Photography does not have any integrated shopping cart or e-commerce features but you can still sell individual photos using PayPal or any shopping cart with a “buy it now” feature. We recommend trying Memberful, which generates a unique product URL for each digital download you want to sell.
After setting up a unique URL your customers will see a link to purchase the photo when they click the info button in the top left corner of an image.
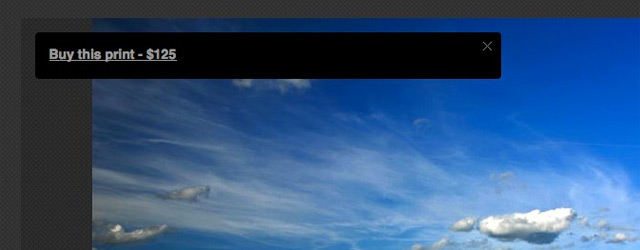
To setup a unique URL, simply add the HTML link in the Caption field in the Media Manager Gallery Editor.
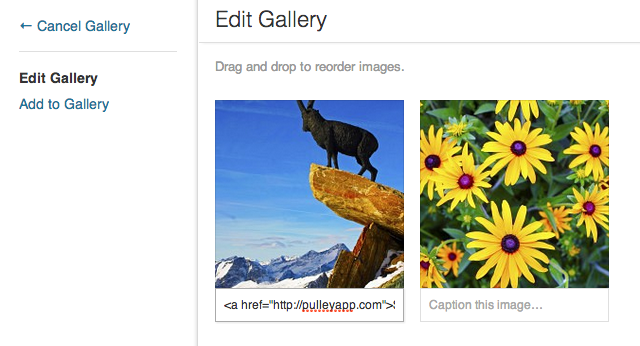
Image dimensions
Where a height is not provided, feel free to insert your own custom value.
Homepage slideshow image:
- Width: 960px
- Height: 640px
Landscape style gallery page thumbnail:
- Width: 294px
- Height: 196px
Portrait style gallery page thumbnail:
- Width: 196px
- Height: 294px
Blog post featured image:
- Width: 960px
- Height: 640px
Blog post image:
- Width: 904px (without sidebar)
- Width: 602px (with sidebar)
- Height: fluid
Inserting images into your blog posts
Keep them below the more tag
The layout of the single post view differs slightly from the main “blog” index view. For this reason you want to be sure to place all your “in post” images below the “more
tag”:http://en.support.wordpress.com/splitting-content/more-tag/. This will give you more room and keep your “blog” page clean (i.e, using only featured images).
Inserting images
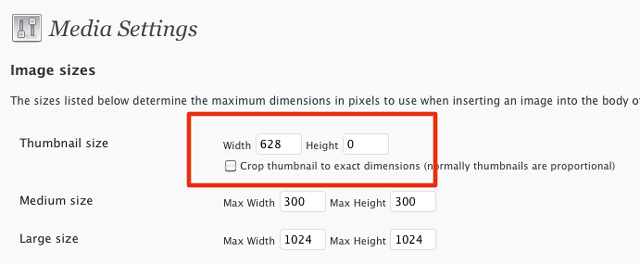
Go to Settings → Media and set your thumbnail width to 960px (leave the height empty) and uncheck the “Crop thumbnails to exact dimensions” box:
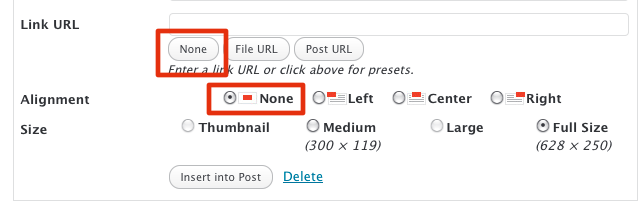
Now when you want to insert an image in your post (remember below the more tag!) simply use the WordPress media uploader tool and choose the “thumbnail” size (should be the default). I would recommend setting the link to “none” as well unless you want the images to be clickable.
You can also “recycle” images from your gallery in your blog posts. Instead of uploading a new image simply click the media library link in the top right of the uploader box. Click show, click “none” for the link, and then click “Insert into post”.
Tip: Make sure “None” is selected in the alignment setting to make sure your images have proper spacing. If you are using smaller images and want to float them left or right then feel free to use that setting.
Theme Options
Custom logo image
Photography allows you to upload a custom logo for the header and optionally a high resolution version of the logo for display on HiDPI monitors. For best results, follow these instructions for adding your custom logo:
- Prepare two images for your header: a regular image and a high resolution image that is twice the size of the regular image. For instance, if your regular image is 100×50, your high resolution image would be 200×100.
- Under the Logo image field, click the Upload Image button and upload the regular size image. Be sure to choose the Full Size option before clicking the Insert into Post button.
- Under the High resolution logo field, click the Upload Image button and upload the regular size image. Be sure to choose the Full Size option before clicking the Insert into Post button.
- Click the Save changes button.
- Your logo should now appear in the header of your site.
Note: You are not required to use a high resolution image. If you do not want to add that image, simply ignore step #3 above.
Display options
Hide Gallery posts in the blog
Enable this option to hide Gallery posts from being displayed in the blog. If you check this option, you must either link directly to the Gallery or include it on a Gallery page in order to visitors to access the content.
Hide Video posts in the blog
Enable this option to hide Video posts from being displayed in the blog. If you check this option, you must either link directly to the Video post or include it on a Gallery page in order to visitors to access the content.
Color Scheme
Photography comes with two built in color schemes. Dark (the default) and light.
Hide template parts
The next 5 options in the Custom logo image options allow you to show or hide elements in the theme templates.
Fonts
Choose the font combination for your site. In each pairing, the first font is the body font and the second is the accent font. For optimum load times, use the Helvetica Neue (Non web font) option. All other fonts will slightly increase page load time.
Gallery display
Slideshow autoplay
By default, all slideshows will automatically loop through the gallery images. To change this behavior, select the “Off” option for the Slideshow autoplay dropdown. Then, click Save changes.
Gallery page captions
You can choose a caption style for the Gallery page template. By
default, captions are off. Selecting Basic captions adds the gallery title below the gallery image. Selecting Fancy captions makes the gallery title appear when you hover on a gallery image.
Enable simple gallery display
Simple gallery display will display all galleries in a site without a title or description. This option allows galleries to be displayed without other text on the page. Beware that this is a global option which enables simple gallery display for every gallery.
Subscribe links & copyright
- Enter the full URL links to your social sites in the provided input fields.
- To disable all of the links, check the box next to Disable all icons.
- Add a line of text to display at the bottom of the page in the Credit line text field.
Flickr
- Go to the Apply for API key page.
- If you have not yet logged into your Flickr account, you will be asked to do so.
- Click on the link to create a new non-commercial API key.
- Give your app a name (e.g., My website name) and a description (e.g., A Flickr gallery for my website.).
- Agree to the terms and click submit.
- You will presented with your API Consumer Key and API Consumer Secret. Copy these values for use in the next step.
- Navigate to Appearance → Photography Options and enter your Consumer Key and Consumer Secret in the Flickr section.
- Click Save Settings to save your details.
- Click the Authenticate button in the Flickr section.
- You will be redirected to Flickr. If you are logged in to Flickr, click the “OK I’LL AUTHORIZE IT” button. If you are not logged in, sign in and then click the “OK I’LL AUTHORIZE IT” button.
- You should be redirected back to your WordPress site and see the “You have authenticated a Flickr account!” message displayed.
Customize
Customizing your background with CSS
Before you begin to edit your background, please read through our tutorial about making CSS modifications to your theme.
Removing the background pattern
Photography, by default, has a crosshatch background pattern. You can see how this background image is loaded in the following code:
Dark color scheme
body {
    background: url(images/bg-dark.png) #2d2d2d;
}
Light color scheme
body.light {
    background: url(images/bg-light.png) #f2f2f2
}
To remove this pattern, you’ll want to add the following code into your child theme’s stylesheet:
Dark color scheme
/* Custom background color */
body {
    background: #2D2D2D;
}
Light color scheme
/* Custom background color */
body.light {
    background: #f2f2f2;
}
Modifying your background color
Use an online color picker to select your background color. Then, update the hex value in the code above. For more information, be sure to read through our tutorial about adjusting colors in your theme with CSS.