Snap is a beautiful theme that can be used to display posts in different ways via the use of different templates and styles. This tutorial will guide you through how to set up the theme similar to our demo site. This tutorial will explain how to set up the main templates for the site, then address adding customizations with theme options, editor styles, and filters.
If you need a hand, email support[at]thethemefoundry[dot]com.
Setting up your homepage
The “Homepage” template is designed to highlight your best and most recent work. As you can see from the demo site and thumbnail below, this template can have a stunning effect.
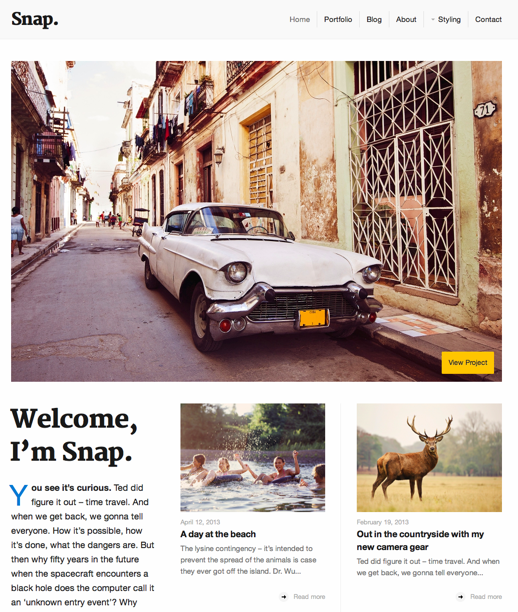
As the name implies, the “Homepage” template is intended to be the main landing page for your website. We believe that this template gives the best representation of the user’s content.
The “Homepage” template is composed of three areas: Featured Area, Content Area, and Posts Area. Each of these areas can be set up to show different types of content, all of which is explained below; however, in order to get started, you must first set up a home page.
Make a homepage
To set up a home page for Snap, a page using the “Homepage” template needs to be designated as the home page:
- Add a new page titled “Home” from your WordPress dashboard.
- Choose “Homepage Template” in the Page Attributes box for the value of the Template dropdown.
- Save the page.
- Create a new page titled “Blog”, leave it empty, and publish it.
- Navigate to Settings → Reading.
- Choose “A static page” from the Front page displays option.
- Set the Front page to the page created in the first step.
- Set the Posts page to “Blog”.
- Save your changes.
Featured Area
The Featured Area was added to the theme to highlight the site’s most exciting content in a “big” way. This area can show one of the three following things:
- Slider containing images
- A single image
- Nothing
If posts are designated to be in the Featured Slider, they will be shown in this area. If no posts are designated for the featured slider, and a Featured Image is set for the page, the image will be shown. Finally, if no posts are designated for the Featured Slider and a Featured Image is not set, nothing will be displayed in the Featured Area.
Featured Slider
The Featured Slider has the first priority in the Featured Area in the “Homepage” template. Whenever there are posts designated for the Featured Slider, a slider will be shown in the Featured Area. It will override any other content in the Featured Area.
To add a post to the featured slider, follow these steps:
- Go to Posts → All Posts.
- Click Edit to get to the “Edit Post” screen for the post you want to add to the slider.
- Find the Portfolio Posts meta box.
- Check the Show in featured slider box.
- Make sure you’ve set a featured image that is at least 994px wide for the post.
- Save the post.
Featured Image
In addition to showing a slider, a single image can be shown in the Featured Area. A Featured Image can only be shown in the Featured Area if there are no posts designated for the Featured Slider.
To setup a Featured Image in the Featured Area, follow these steps:
- Go to Pages → All Pages.
- Click the edit link for the page that is using the “Homepage” template.
- Click Set Featured Image, which is usually located in the lower right hand area of the screen.
- Choose an existing image or upload a new image.
- Click Set featured image.
- Save the post.
As long as you currently have no posts designated for the Featured Slider, this image will display at the top of the page.
The image used for the Featured Image in the Featured Area must be a minimum of 994px wide so that it fills the entire width of the theme on all devices. The height is flexible in this area and does not need to be a specific value.
Blank Featured Area
In the event that there are no posts designated for the Featured Slider and no Featured Image is set for the page, nothing will be shown in the Featured Area.
Content Area
The Content Area allows you to add arbitrary text to the left most column under the site header. Anything that you can put in the post’s content can be placed in this section. We recommend adding informative text that introduces your visitors to your website.
To add content to the featured slider, follow these steps:
- Go to Pages → All Pages.
- Click the edit link for the page that is using the “Homepage” template.
- Add content to the WordPress Editor.
- Save the page.
To set a “drop-cap” styling for this area like seen on our demo site, see the Styles section below.
Posts Area
The Posts Area can contain one of the following collections of posts:
If posts have been selected for the homepage, the selected posts will be shown in the Posts Area. On the other hand, if no posts are selected for the homepage, the latest blog posts will be shown.
Selected Posts
In order to show selected posts and pages in the Posts Area, posts must be selected for the homepage. Selecting posts can be accomplished with the following steps:
- Go to Pages → All Pages.
- Click on the title of the homepage page.
- In the page edit screen, a metabox titled Selected Posts should be displayed. If not, try the following steps:
- Click Screen Options in the upper right hand corner of the screen.
- Check the box next to Selected Posts.
- Verify that the Page Template select box in the Page Attributes metabox is set to “Homepage Template”.
- The Featured Posts metabox shows a list of “Recent Posts” and one of “Recent Pages”. Click an item to add it.
- The “Recent Posts” and “Recent Pages” lists only show your 10 latest items. To locate more posts, click the Search tab.
- In the input field, start typing the title of the post or page you want to add.
- A list of posts matching the search will be displayed. Select the desired post by clicking it or using the down arrow and pressing enter.
- The post will be added to the “Current Posts” list.
- If you have 2 or more posts in the list, you can drag and drop them to order the posts.
- Save the page.
Latest Posts
By default, the blog’s latest post are shown in the Posts Area. If posts have been selected for the homepage, the selected posts will show instead of the latest posts. If selected posts are currently shown in the Posts Area, latest posts can be shown by following these steps:
- Go to *Pages → All Pages**.
- Click on the title of the homepage page.
- In the page edit screen, a metabox titled Featured Posts should be displayed. If not, try the following steps:
- Click Screen Options in the upper right hand corner of the screen.
- Check the box next to Featured Posts.
- Verify that the Page Template select box in the Page Attributes metabox is set to “Homepage Template”.
- In the *Featured Posts** metabox, posts will be displayed under the “Current Posts” header.
- Next to each post, click the “Remove” link.
- Once each post is removed and the “No posts currently associate with this page” notice is shown, save the post.
After going through these steps, the blog’s latest posts will be shown.
Setting up your portfolio page
The “Portfolio” template is a beautiful page template that highlights your finest work as represented by a large image, title, excerpt, date and tags.
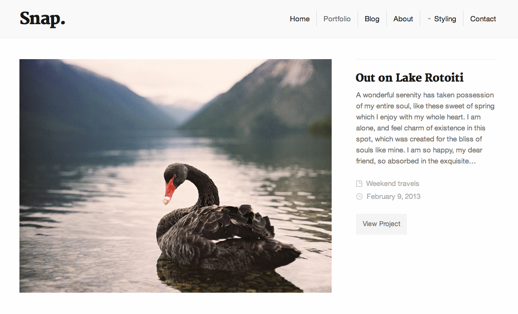
Any page can use the “Portfolio” template and multiple pages can use the template. For instance, a mixed media artist can choose to create two portfolio pages, one featuring her latest photography and the other featuring her latest sketches.
Creating a portfolio page with the “Portfolio” template is a two part process; first, you must create a page, then you must add portfolio items.
Creating the portfolio page
To add a new portfolio page, follow these steps:
- Go to Pages → Add New.
- Give the page a title. For instance, our demo site uses “Portfolio” as the title.
- Choose “Portfolio Template” in the Page Attributes box for the value of the Template dropdown.
- Save the page.
Adding portfolio items
Once the page has been created, portfolio items can be added to the page. Portfolio items can be custom ordered on the page after adding them to the page.
- Go to Pages → All Pages.
- Click on the title of the portfolio page that you want to add posts to.
- In the page edit screen, a metabox titled Portfolio Posts should be displayed. If not, try the following steps:
- Click Screen Options in the upper right hand corner of the screen.
- Check the box next to Portfolio Posts.
- Verify that the Page Template select box in the Page Attributes metabox is set to “Portfolio Template”.
- The Portfolio Posts metabox shows a list of “Recent Posts”. Click a post to add it. (Note that unlike the Homepage, only posts are available for the Portfolio, not pages).
- The “Recent Posts” list only shows your 10 latest posts. To locate more posts, click the Search tab.
- In the input field, start typing the title of your posts.
- A list of posts matching the search will be displayed. Select the desired post by clicking it or using the down arrow and pressing and pressing enter.
- The post will be added to the “Current Posts” list.
- If you have 2 or more posts in the list, you can drag and drop them to order the posts.
- Save the page.
Preparing portfolio items
The term “portfolio item” refers to a post that is displayed on a portfolio page. As soon as you add an item to a portfolio page, a regular post becomes a portfolio item.
It is important that portfolio items have the correct data set in order to make the portfolio page look awesome.
For each post that is added to a portfolio page, we recommend the following:
- Use a Featured Image that is at least 994px wide. We recommend this width because it will not cause stretching at any screen width.
- Add an excerpt that is no more than 110 words (please keep in mind you might need to enable Excerpts by clicking on the Screen Options tab near the top). The excerpt is truncated at 110 words in order to maintain the page’s layout.
- Tags are displayed below the content excerpt and above the date in the portfolio item listing. In order for the tag listing to look best, we recommend capitalizing each word in the tags and limiting the tag list to no more than three items.
- The “View Project” button label can be changed in the Theme Customizer.
Setting up your profile page
While many of the templates in Snap aim to highlight an artist’s work, the “Profile” template highlights the artist and features a portrait image, excerpted text, and content as can be seen on the demo site and the screenshot below.
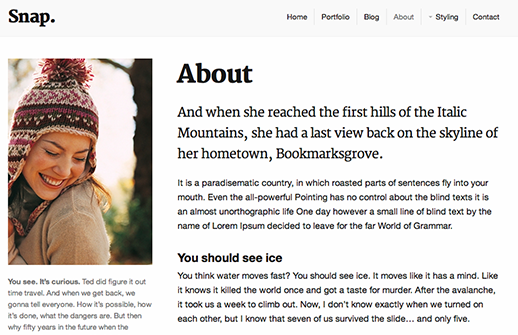
The “Profile” template can be used for any page and can be used multiple times within the same site. This template is excellent for about pages, contact pages, and profiling site contributors.
To add a profile page, follow these steps:
- Go to Pages → Add New.
- Give the page a title. For instance, our demo site uses “About” as the title.
- Choose “Profile Template” in the Page Attributes box for the value of the Template dropdown.
- Add a Featured Image that is at least 292px wide. The image is intended to show a picture of a person and for best results, we recommend using a portrait image.
- Add an Excerpt. The excerpt is the text that displays below the image on the page. We recommend using an excerpt that is about 100 words to appropriately fill the space.
- Add post content. We recommend that you add enough content for the right hand column to be longer than the left hand column. Doing so will provide a nicely balanced page.
- Save the page.
The Blog
Snap’s blog implements a gorgeous grid that automatically truncates your content to maintain a pixel perfect and correctly aligned posts page. Take a look at the page by viewing our demo site or the screenshot below:

By default, the blog will be the home page for the site. To set up the blog page, there is nothing that a user must do other than add posts to the site.
In order for the blog page to look absolutely stunning, we recommend the following:
- Featured Images need to use a 4:3 ratio. Once installing Snap, the theme will automatically generate a 600×450 thumbnail for newly uploaded Featured Images. Make sure that you use images that are at least 600px wide and 450px high.
- If you are using existing images, we highly recommend resizing your images using the excellent Regenerate Thumbnails plugin. Please see the guide below.
- For posts without a Featured Image, we recommend adding a longer excerpt (approximately 110 words) in order for the content to fill the square.
- For posts with a Featured Image, use a shorter excerpt (approximately 55 words).
- Regardless of the length of the excerpt, Snap will truncate and add an ellipsis to any content that runs outside of the grid. This truncation ensures the integrity of the grid.
- The grid layout is Infinite Scroll ready! Install Jetpack and activate Infinite Scroll to implement it.
To regenerate thumbnails, follow these steps:
- Install the Regenerate Thumbnails plugin.
- Go to Tools → Regen. Thumbnails.
- Click the Regenerate All Thumbnails button.
- Resizing is completed when the “All done!” message appears.
Options
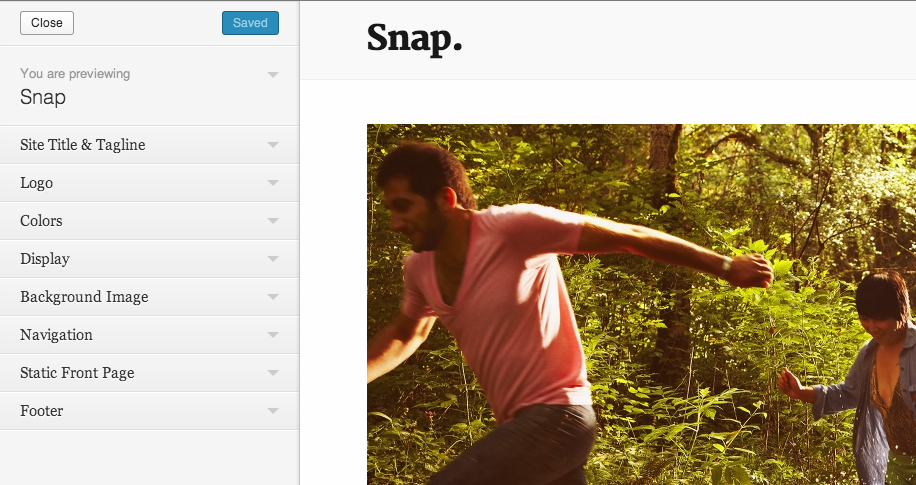
Snap offers the ability to customize certain parts of the theme through the Theme Customizer. Changing options is the easiest way to alter the theme. While you cannot customize every part of the theme with the customizer, the important optional features in Snap have been made available in the Theme Customizer.
Invoking the Theme Customizer
- With your mouse, hover over the site name in the admin bar.
- In the menu that is revealed, click the Customize link.
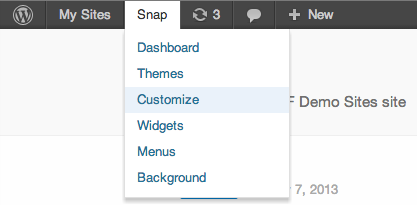
- The customizer will now be shown in the left hand side of the page with the site showing in the right hand side of the page.
Upload a custom logo
Snap allows users to set a site logo, with the additional option of setting a hi-resolution version of the logo for use with HiDPI devices.
- Invoke the Theme Customizer by hovering over the name of your site in the admin bar and clicking Customize.
- Click the Logo heading.
- Under the Regular Logo heading, either click the No image button or, if a current image exists, click the image.
- Drag a logo to the area that says “Drop a file here” or click the select a file link and add a logo.
- As soon as the logo is uploaded, a preview of the site with the logo will be displayed.
- To add a “Retina Logo”, repeat these steps in the Retina Logo section.
- Click Save & Publish.
Based on the logo(s) that are uploaded, the theme makes decisions about how to generate the logo:
- If only a Regular Logo is uploaded, the regular logo will display for all devices.
- If only a Retina Logo is uploaded, the retina logo will display for all devices, but will display at 50% of its original dimensions. This size reduction is to ensure that the retina effect is achieved.
- If both Regular Logo and a Retina Logos are uploaded, HiDPI devices will see the retina logo at 50% of its original dimensions and non-HiDPI devices will see the regular logo at its original dimensions.
Colors
In the Colors section of the Theme Customizer panel, users can choose to change the color of different elements in the theme. The color controls allow for setting a background color, primary color, and secondary color.
Background color
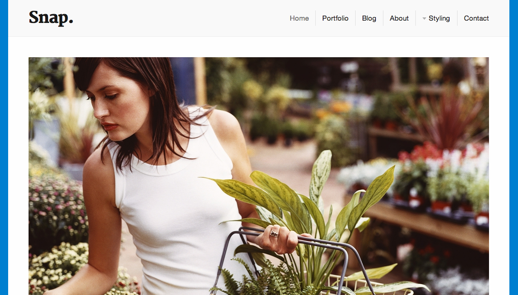
Setting a color for the Background Color setting will change the body background color, which will be seen on the left and right hand side of the page. For instance, setting the color to #007fd0 will result in a page that looks like the following:
To set the background color, follow these steps:
- Invoke the Theme Customizer by hovering over the name of your site in the admin bar and clicking Customize.
- Click the Colors heading.
- Under the Background Color heading, click Select Color.
- Add a hexidecimal color value or choose a color with the Iris color picker.
- The new color will be previewed in the right hand side of the page.
- Click Save & Publish.
Primary color
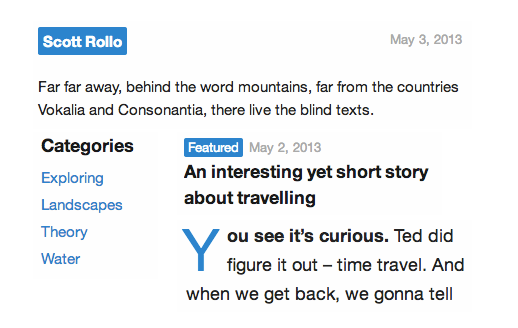
The primary color in the theme is a blue color. This color is used for links, drop cap styling, featured posts alerts, and post author highlights. A sampling of these elements can be seen in the image below:
To set the primary color, follow these steps:
- Invoke the Theme Customizer by hovering over the name of your site in the admin bar and clicking Customize.
- Click the Colors heading.
- Under the Primary Color heading, click Select Color.
- Add a hexidecimal color value or choose a color with the Iris color picker.
- The new color will be previewed in the right hand side of the page.
- Click Save & Publish.
Secondary color
The secondary color in the theme is a yellow color. This color is used for buttons and the mobile menu toggle. A sampling of these elements can be seen in the image below:

To set the primary color, follow these steps:
- Invoke the Theme Customizer by hovering over the name of your site in the admin bar and clicking Customize.
- Click the Colors heading.
- Under the Secondary Color heading, click Select Color.
- Add a hexidecimal color value or choose a color with the Iris color picker.
- The new color will be previewed in the right hand side of the page.
- Click Save & Publish.
Display
The group of display options allow users to change certain elements in the Snap theme.
Portfolio item button text
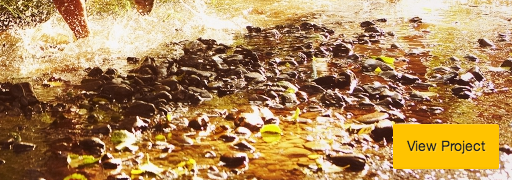
The Portfolio Item Button Text option allows you to override the text displayed in the buttons on portfolio items. By default, this text is “View Project”:
To change the default button text, follow these instructions:
- Invoke the Theme Customizer by hovering over the name of your site in the admin bar and clicking Customize.
- Click the Display heading.
- In the box under the Portfolio Item Button Text, add the desired button text.
- The new text will be displayed in the right hand side of the page.
- Click Save & Publish.
Hide featured image on post pages
In some cases, it may be desirable to hide featured images on single post pages. For instance, users may want to show the featured image in the grid blog post listing, but not show the image on the individual post page.
To hide the featured image on post pages, follow these instructions:
- Invoke the Theme Customizer by hovering over the name of your site in the admin bar and clicking Customize.
- Click the Display heading.
- Check the box next to Hide featured image on post pages.
- Click Save & Publish.
Hide portfolio posts from the blog
To hide portfolio posts from the blog, follow these instructions:
- Invoke the Theme Customizer by hovering over the name of your site in the admin bar and clicking Customize.
- Click the Display heading.
- Check the box next to Hide portfolio posts from the blog.
- Click Save & Publish.
Disable Merriweather web font
The Merriweather Google web font is used for heading text in Snap. Users wishing to disable the font due to issues with displaying certain characters or to enhance compatibility with web font plugins can do so easily.
To disable the Merriweather web font, follow these steps:
- Invoke the Theme Customizer by hovering over the name of your site in the admin bar and clicking Customize.
- Click the Display heading.
- Check the box next to Disable Merriweather web font.
- Click Save & Publish.
Background Image
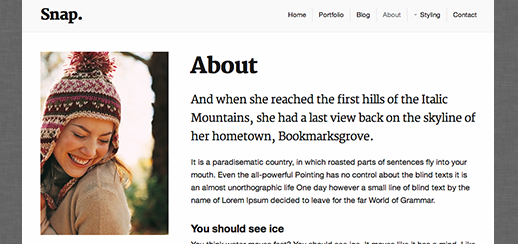
Setting an image for the Background Image setting will change the body background, which will be seen on the left and right hand side of the page. As an example, the following image shows the demo site with a “gray wash” background image:
To set the background image, follow these steps:
- Invoke the Theme Customizer by hovering over the name of your site in the admin bar and clicking Customize.
- Click the Background Image heading.
- Under the Background Image heading, either click the No image button or, if a current image exists, click the image.
- Drag an image to the area that says “Drop a file here” or click the select a file link to add an image.
- As soon as the image is uploaded, a preview of the site with the background image will be displayed.
- Click Save & Publish.
Footer text
Snap allows for the addition of arbitrary text in the footer of the the theme. To add this text, follow these instructions:
- Invoke the Theme Customizer by hovering over the name of your site in the admin bar and clicking Customize.
- Click the Footer heading.
- In the Footer Text text input, enter the desired footer text.
- A preview of the footer text will be displayed in the right hand side of the page.
- Click Save & Publish.
Social links
A Twitter, Facebook, Google Plus, Flickr, Pinterest, LinkedIn, and RSS social link can be added to your site’s footer. The social links look like the image below:

To add the social links, follow these steps:
- Invoke the Theme Customizer by hovering over the name of your site in the admin bar and clicking Customize.
- Click the Footer heading.
- Fill in the social URL text inputs.
- A preview of the links will be displayed in the right hand side of the page.
- Click Save & Publish.
Styles
Snap offers a number of custom styles that a user can add to post content. Each of these styles add a little flair to the content, making it that much more visually appealing. The styles are implemented via added buttons in the WordPress editor.
Alert, Note, Success, and Error Styles
Snap provides 4 block level styles that allow wrapping a block of text in colored background. These styles are intended to add a block of call out text that matches the Snap color palette. The four styles are show in the screenshot below:
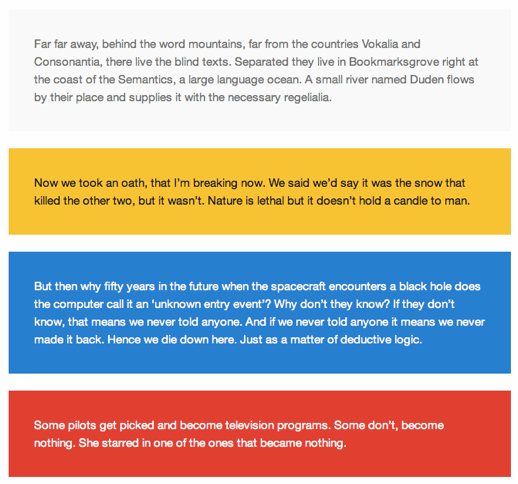
The following list documents the color associated with each style:
- “alert”: gray (#f9f9f9)
- “note”: yellow (#ffc300)
- “success”: blue (#007fd0)
- “error”: red (#e14023)
To add a style, follow these instructions:
- In the post or page editor, click the Show/Hide Kitchen Sink icon in the post editor, which is highlight in the screenshot below:

- Highlight a full paragraph of text:

- Click the button that corresponds with the desired style that was revealed when clicking the Show/Hide Kitchen Sink icon in the first step.
- Save the post.
Drop Cap
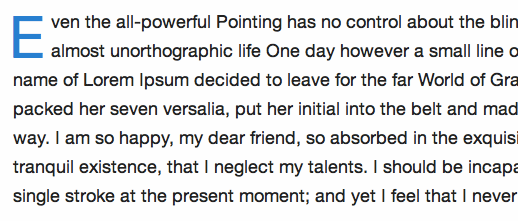
The drop cap styling adds a stylized first letter to a paragraph. It is recommended that this styling is only ever used for the first letter in a post or page. Overuse of this styling in a single page of content can be confusing to the reader.
The blue letter “E” in the screenshot below is an example of the drop cap styling in Snap:
To add drop cap styling to a letter, follow these instructions:
- In the post or page editor, click the Show/Hide Kitchen Sink icon in the post editor, which is highlight in the screenshot below:

- Highlight a single character in a paragraph of text:

- Click the drop-cap button that was revealed when clicking the Show/Hide Kitchen Sink icon in the first step.
- Save the post.
Intro Text
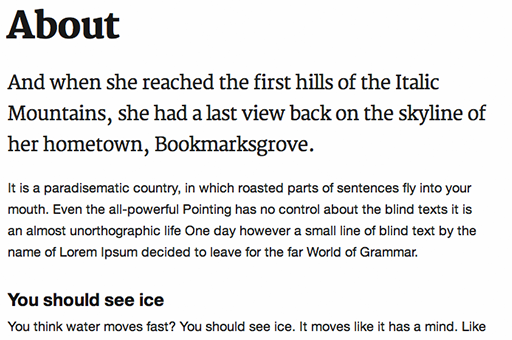
In order to emphasize some introductory text, Snap includes an “intro text” style, which is the large text seen below:
To add the intro text, follow these instructions:
- In the post or page editor, click the Show/Hide Kitchen Sink icon in the post editor, which is highlight in the screenshot below:

- Highlight a full paragraph of text:

- Click the intro button that was revealed when clicking the Show/Hide Kitchen Sink icon in the first step.
- Save the post.
Advanced filters
Snap offers WordPress filters for changing theme behavior with code snippets. Using filters is the most difficult way to alter the theme and should only be done if you are comfortable working with PHP. These filters and the sample code should be placed in your child theme’s functions.php file. While placing these filters in your parent theme’s functions.php will work, the customization will be removed when you update the theme. Read more about setting up your child theme in our customization tutorial.
snap_add_formatting_buttons
Snap adds formatting buttons to the WordPress editor. These buttons can be disabled by setting the return value of the snap_add_formatting_buttons to false.
add_filter( 'snap_add_formatting_buttons', '__return_false' );
snap_add_menu_parent_class_name
Menu items that have a child menu are given a class of snap-menu-parent-item. This value can be changed via the snap_add_menu_parent_class_name filter.
function snap_child_add_menu_parent_class_name( $current_class_name, $item, $items ) {
    return 'my-alternative-class-name';
}
add_filter( 'snap_add_menu_parent_class_name', 'snap_child_add_menu_parent_class_name', 10, 3 );
snap_get_social_links
The get snap_get_social_links filter allows you to add, remove, reorder, or edit social icon links in the site footer. For instance, to add a link for instagram, use the code below.
In functions.php:
function my_snap_get_social_links( $services ) {
    $services['instagram'] = array(
        'title' => 'Instagram',
        'url'   => 'http://path.com/to/instagram-profile'
    );
    return $services;
}
add_filter( 'snap_get_social_links', 'my_snap_get_social_links' );
In style.css:
.icons li a.instagram {
    width: 18px;
    background: url(http://path/to/icon/image) no-repeat;
    background-size: 18px 18px;
}
responsive_nav_options
The responsive_nav_options filter allows you to easily change the configuration of the responsive nav menu. For instance, a developer can change the “Show Menu” label to “Open Menu”.
function my_responsive_nav_options( $defaults, $page_id ) {
    $defaults['label'] = __( 'Open Menu', 'snap' );
    return $defaults;
}
add_filter( 'responsive_nav_options', 'my_responsive_nav_options', 10, 2 );
For more Responsive Nav options, see the Responsive Nav documentation.
responsive_slides_options
The responsive_slides_options filter allows a developer to change the options that control the slider on the homepage template. For instance, a developer can change the speed of the animated transition between slides to 2 seconds.
function my_responsive_slides_options( $defaults, $page_id ) {
    $defaults['speed'] = 2000;
    return $defaults;
}
add_filter( 'responsive_slides_options', 'my_responsive_slides_options', 10, 2 );
For more Responsive Slides options, see the Responsive Slides documentation.
snap_trim_portfolio_page_excerpt
Portfolio page excerpts are trimmed to 110 words by default. The snap_trim_portfolio_page_excerpt filter allows a developer to change the size of the excerpt. For instance, a developer could easily change the except to 55 words,
function my_snap_trim_portfolio_page_excerpt( $default ) {
    return 55;
}
add_filter( 'snap_trim_portfolio_page_excerpt', 'my_snap_trim_portfolio_page_excerpt' );
snap_homepage_latest_posts_args
The snap_homepage_latest_posts_args allows a developer to change the posts that are displayed in the Latest Posts listing in the Posts Area of the home page. This filter allows for alteration of the arguments that are sent to the WP_Query class when querying for the posts. For instance, a developer can choose to display sticky posts in this section of the home page.
function my_snap_homepage_latest_posts_args( $args ) {
    $args['ignore_sticky_posts'] = false;
    return $args;
}
add_filter( 'snap_homepage_latest_posts_args', 'my_snap_homepage_latest_posts_args' );
snap_button_text
The snap_button_text filter allows a developer to change the text displayed in the portfolio project button. While this value can be changed in the customizer, this filter gives the developer greater control over the display. For instance, the developer could choose to use the label “See Photo” on one page, while displaying “View Painting” on another.
function my_snap_button_text( $text, $item_id, $page_id ) {
    if ( 5 === $page_id ) {
        return __( 'See Photo', 'snap' );
    } else {
        return __( 'View Painting', 'snap' );
    }
}
add_filter( 'snap_button_text', 'my_snap_button_text', 10, 3 );
snap_attached_posts_label_defaults
The snap_attached_posts_label_defaults filter allows a developer to change labels that are displayed in the post chooser for the “Portfolio” and “Homepage” templates. For instance, a developer can change the “Selected Posts” label to “Current Posts”.
function my_snap_attached_posts_label_defaults( $default_labels, $key, $post_types, $labels ) {
    $default_labels['selected_posts'] = __( 'Current Posts', 'snap' );
    return $default_labels;
}
add_filter( 'snap_attached_posts_label_defaults', 'my_snap_attached_posts_label_defaults', 10, 4 );
snap_recent_posts_in_chooser_args
By default, the post chooser shows the 10 latest posts in the “Recent Posts” area. To alter the posts shown in the “Recent Posts” area, a developer can use the snap_recent_posts_in_chooser_args filter to change the arguments sent to the WP_Query class. For instance, a developer can show only the 3 latest posts.
function my_snap_recent_posts_in_chooser_args( $args, $post_id, $object ) {
    $args['posts_per_page'] = 3;
    return $args;
}
add_filter( 'snap_recent_posts_in_chooser_args', 'my_snap_recent_posts_in_chooser_args', 10, 3 );
snap_is_portfolio_post
The snap_is_portfolio_post() function determines if a post is a portfolio item (i.e., the post is attached to a page using the “Portfolio” template). A developer can add custom logic to this function. For instance, the developer can always mark post with ID 50 as a portfolio item.
function my_snap_is_portfolio_post( $is_portfolio_item, $id ) {
    if ( 50 === $id ) {
        $is_portfolio_item = true;
    }
    return $is_portfolio_item;
}
add_filter( 'snap_is_portfolio_post', 'my_snap_is_portfolio_post', 10, 2 );
