Create beautiful buttons in Photoshop
By team on October 15, 2010
A few months ago I re-designed all of the buttons here on The Theme Foundry website. In this tutorial I am going to walk through the button design process step-by-step.
Quick Overview
- Application: Photoshop CS4 (CS5 should work fine as well)
- Difficulty: Beginner – Intermediate
- Estimated completion time: 15 – 20 minutes
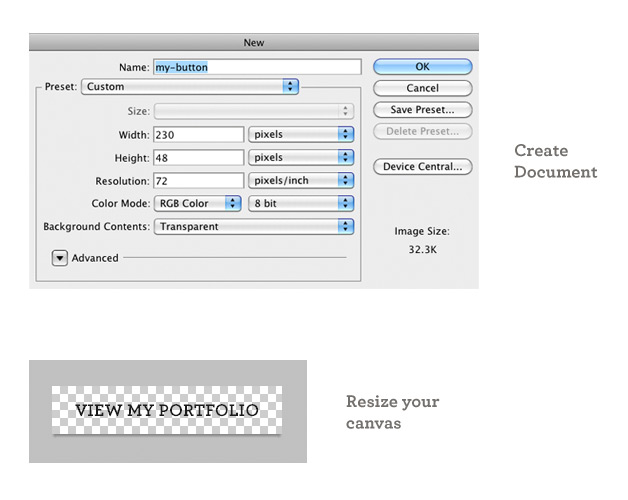
Step 1: Input your button text and adjust the canvas size
Create a new Photoshop document (set the background contents to Transparent) and enter some text for your new button. The font used in this example is Archer Bold. If you want a free alternative check out Museo Sans 700. Position the text in the center of the canvas by dragging it with the select tool and adjust the canvas size proportionately (Image → Canvas Size) to the size of your text.
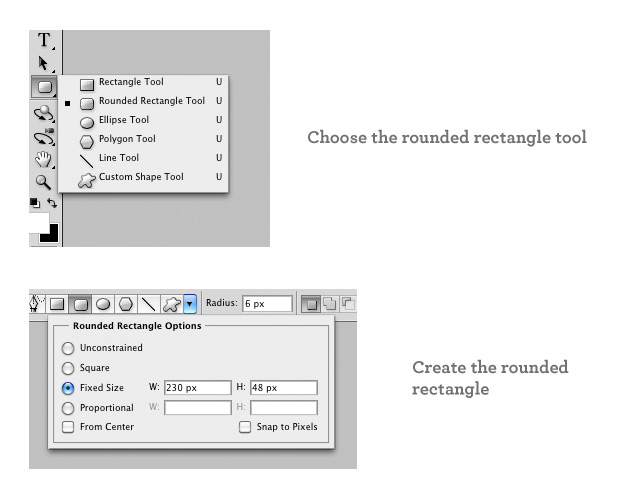
Step 2: Create your button
Find the rounded rectangle tool and select it. Once the rounded rectangle tool is selected you will see some options in the toolbar at the top of the Photoshop window. Change the Radius to 6px and set the rounded rectangle to a Fixed Size that matches your canvas size exactly. To create the button simply click the middle of the canvas and re-position the rounded rectangle so it is centered (it should snap into place).
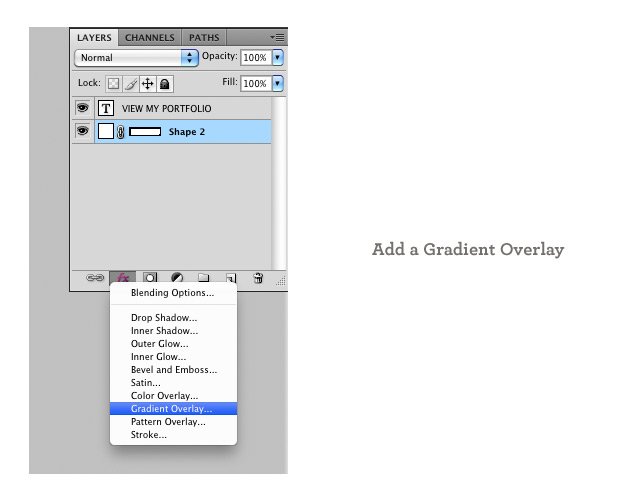
Step 3: Add a Gradient Overlay
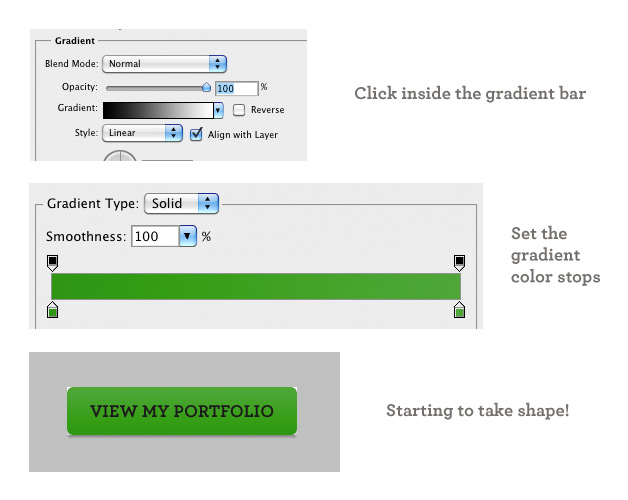
You should now have a very plain looking rounded rectangle on top of your text. Re-arrange your layers so the text is on top of the rectangle (see image). Select the new shape from your layers panel and choose Gradient Overlay from the effects menu at the bottom of the layers panel. Now add a green gradient overlay by double clicking the left and right color stops one at a time (the two house shaped icons underneath the gradient bar). Set the left color stop to 2f9514 and the right color stop to 5bbf40. The button should now have a nice gradient green overlay and is starting to take shape!
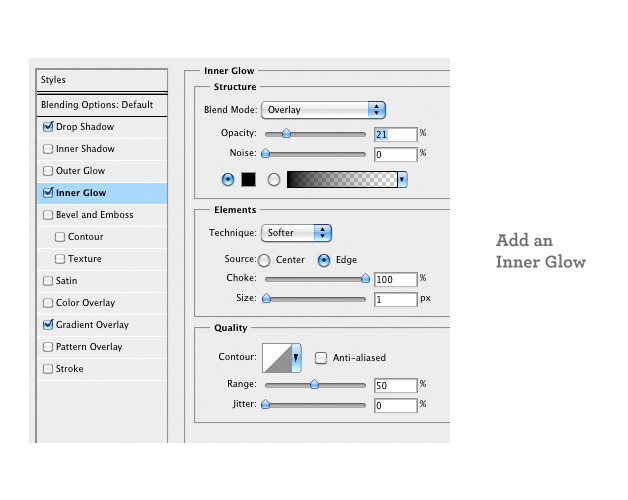
Step 4: Add an Inner Glow
Without leaving the layer style panel check the Inner Glow box in the left column. In the Structure section set the Blend Mode to Overlay, drop the Opacity to 21%, and change the color to black (000000). From within the Elements section increase the Choke to 100% and reduce the Size to 1px. Click OK!
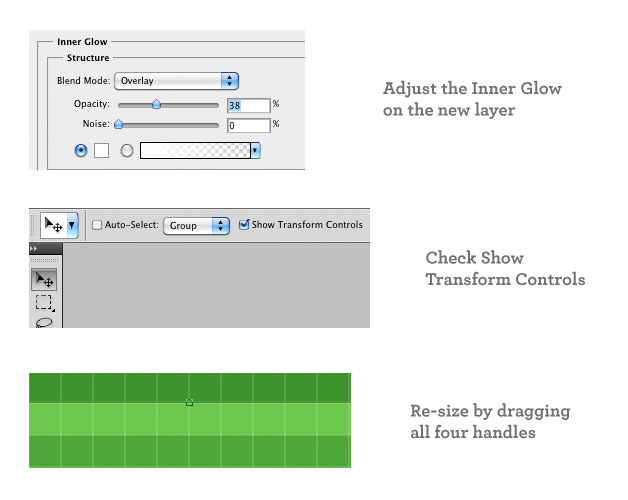
Step 5: Duplicate, re-style, resize
Duplicate the shape layer we just worked on by right clicking it in the layers panel and selecting Duplicate Layer. Select the new shape from the layers panel (should be called Shape 1 copy) and double click the Inner Glow style from the layers panel underneath the new Shape 1 copy layer. Set the color to white (ffffff) and increase the Opacity to 38%.
Click on the select arrow and then check the Show Transform Controls checkbox inside the toolbar at the top of the window. Now hold down Command (Control on Windows) + Spacebar to show the zoom tool. Use the zoom tool to drag a small box around the top-center transform handle. This will give us a close-up view of the button. Click and drag the top-center transform handle down like a window shade, revealing the original inner glow (see image below). While zoomed in scroll around the canvas and repeat this for the center-left transform handle, center-right transform handle, and center-bottom transform handle. The transform handles may be hard to find because they are sitting on the very edge of the canvas, so be sure to look closely. When finished click the checkmark in the top toolbar to commit the changes.
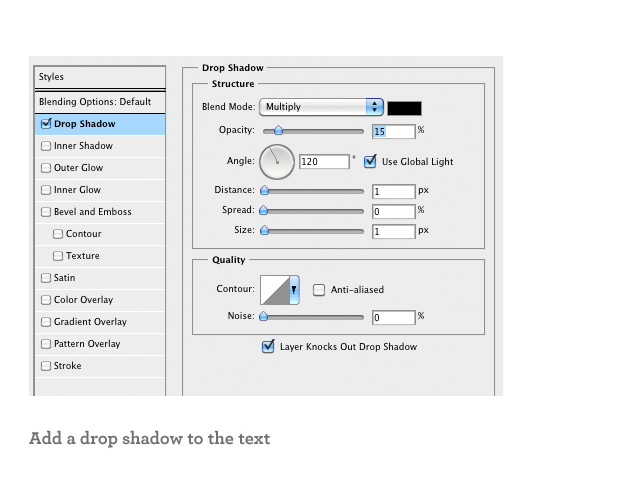
Step 6: Clean up the text
Zoom back out by holding down Command (Control on Windows) + 1. Double click the text box icon (big letter T) inside the “View My Portfolio” layer in your layers panel. Use the toolbar at the top of the window to set the text color to white (ffffff) and click the checkmark to commit the changes.
Add a drop shadow by clicking the effects button at the bottom of the layers panel (the same button you clicked earlier when adding the gradient overlay) and choosing Drop Shadow from the list. Reduce the Opacity to 15% and reduce the Distance and Size to 1px.
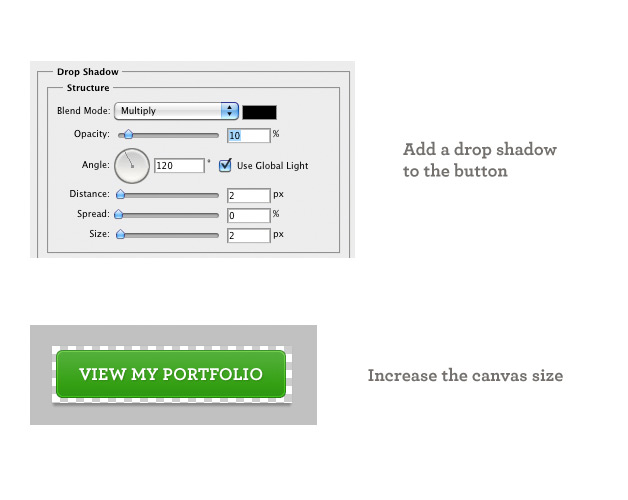
Step 7: Add a drop shadow to the button
Select the original shape from the layers panel and and a drop shadow by clicking the effects button at the bottom of the layers panel. Set the Opacity to 15% and the Distance and Size to 2px. Increase the size of the canvas by 5px on each side to make room for the new drop shadow.
Step 8: Save and enjoy!
Save your new button for the web by choosing “Save for Web & Devices” from the File menu (I recommend saving it as a 24 bit transparent PNG) and start using it on your site. If you enjoyed this tutorial or want to share some feedback drop a line in the comments.
Terms of use: You may freely use these files without restriction. No attribution or backlinks are required, but you are one cool cat if you leave a link. You are not permitted to make these files available for distribution elsewhere without prior consent.
Enjoy this post? Read more like it in Tutorials.