Minimum requirements
Bailey requires WordPress 3.9 or above.
Getting help
The documentation below explains all of the main features of Bailey and how to get the most out of the theme.
If you need a hand, email support[at]thethemefoundry[dot]com.
Installation
Please read our tutorial on Installing your new theme.
Introduction to Bailey
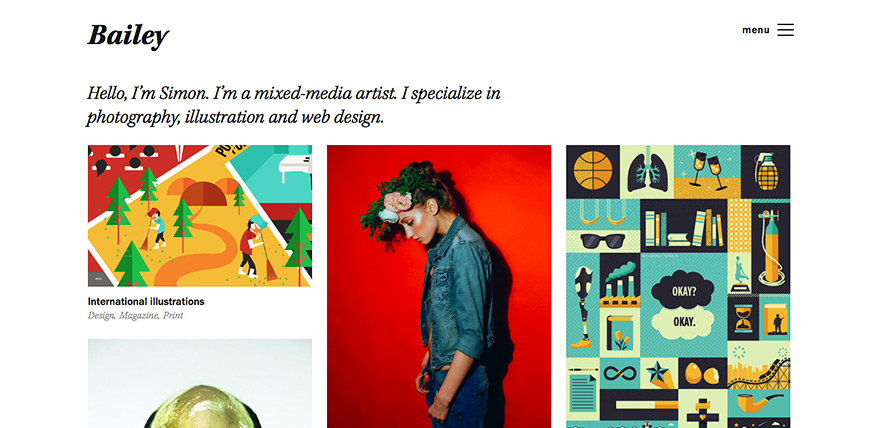
Bailey is a minimal portfolio theme that gives you a lot of flexibility in showing off your best work to the world. Its main feature is a Portfolio content type that you can use to feature your artwork, photographs, videos, or other creative endeavors while keeping them separate from your blog or other website pages. It also features a fully functional blog with several customization options.
Typekit® fonts
Bailey comes with two premium Typekit® fonts, Franklin Gothic URW and Kepler Std, built right in, without the need for a separate Typekit account. When you first install and activate the theme, you will see a notice that you need to authorize your site in order to display the fonts.
- Upon activation, you will be directed to the Font Authorization screen. You can also access this screen under the Appearance menu.
- Here, you will see two options: Authorize and Use Typekit Kit ID.
- In most cases, the Authorize option will be sufficient. Enter the email address and password associated with your Theme Foundry account.
- Click Authorize Site. You will only need to do this once per domain.
There are some special cases where the Use Typekit Kit ID option will be necessary. The most common of these is if your copy of Bailey is getting more than 50,000 page views per month across all of the domains for which it is authorized. In this case you will need to sign up for your own Typekit account and create your own kit to use. This field is where you enter your own kit ID.
Setting up your site
If you go through each of the following sections of this tutorial, you will learn how to make the most of what Bailey has to offer. The sections are organized in a way that might make sense if you are building a brand new site with content you have already created, but of course you don’t have to follow this order to get your site up and running.
The Customizer
Many sections of this tutorial refer to options within the WordPress Theme Customizer. One way to get to the Customizer is to click on Customize under the Appearance menu. You can also bring up the Customizer for a particular view by navigating to that view on the front end of your site and then clicking Customize from the dropdown menu in the Admin bar at the top of the screen.
Branding your site
Bailey‘s design is intentionally minimal in order to put the emphasis on the projects in your portfolio. However, you can tailor many aspects of the visual design to match your personal or company branding.
Logo
The Logo section of the Customizer has four options:
Regular / Retina Logo
These options allow you to add your custom logo to the site header as a replacement for the site title text. The Retina Logo option enables your logo to appear sharp on HiDPI displays, and should be another version of Regular Logo image that is twice the dimensions. So if the Regular Logo is 300px x 200px, the Retina version should be 600px x 400px.
You don’t have to use both options, but we recommend it for the best visual performance on your site.
Favicon
Most web browsers will associate a small icon with your website’s domain if one is available. This is most often referred to as a Favicon. To add a Favicon version of your logo, the file you upload must be in the PNG or ICO file format, and should be 32px x 32px.
Apple Touch Icon
Similar to a Favicon, the Apple Touch Icon is used by some devices and apps as a visual representation of your site. This version of your logo must be in the PNG file format and should be 152px x 152px.
Color scheme
Bailey has five color settings that allow you to completely customize the color scheme of your site to match your brand. Four of them are located in the Colors section of the Customizer, and the fifth is the site background color, located in the Background section. You will need to experiment with each setting in the Customizer to get a feel for which elements it affects, but here is a general guide:
- Accent Color: links, project captions
- Detail Color 1: site menu background, comment details, sticky post labels
- Detail Color 2: post meta information, site menu content, captions
- Main Color: most other text, input borders, button backgrounds
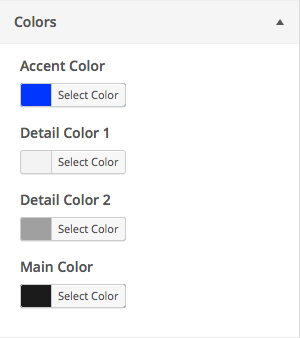
This color scheme can be overridden on individual posts, pages, and projects.
Social profile links
![]()
In the Social Profiles & RSS section of the Customizer you can add links to your social network profiles that will appear in the site footer. Find the desired service in the list of available options and paste the complete URL to your profile into the text field, e.g. https://twitter.com/thethemefoundry.
If you would like to add a link to a service that is not in the list, you will need to use a filter hook.
You can also add your email address, which will create a mailto: icon link in the site footer.
By default, an icon link to the site’s RSS feed generated by WordPress also appears in the footer. You can hide this icon by checking the box, or change the feed link that the icon points to by adding the complete URL into the Custom RSS URL field.
Setting up your portfolio
Your portfolio in Bailey is made up of individual items called “Projects”. Projects are similar to posts, in that they can contain all the same kinds of text and media, but because they are a separate type of content, Bailey is able to display projects with a distinct visual style and layout.
There are two different ways to organize projects:
- They can be categorized with project “types” and tags, similar to post categories and tags. Your visitors can then view all the projects of the same type or tag by going to the relevant archive page.
- They can be added and arranged manually on Portfolio pages.
Add projects
To add a new project:
- Navigate to Portfolio → Add New.
- Add a title.
- Add a featured image.
- Add some content!
- Click Publish.
When viewing an individual project, all of the content is contained within a column that sits on the right edge of the site, leaving some space on the left. However, there are some specific elements that are full-width, meaning they stretch beyond the bounds of the content column. These elements include a specific image size, the gallery slider, embedded videos, and blockquotes.
See an example project.
Full-width images
When inserting images into the content editor, you can choose a specific size to use from the Size dropdown under Attachment Display Settings. To make an image display full-width on your project, choose the Project Full Width size. This option will appear as long as the original image is at least 1042 pixels wide.
More on adding photos and images.
Gallery sliders
Bailey includes an enhancement that allows you to transform a normal WordPress gallery grid into a slider, which can be used anywhere that you can insert a [gallery] shortcode. Gallery sliders will display full-width on projects.
- In the content editor, place the cursor at the position where you would like to have a gallery slider.
- Click Add Media.
- Choose Create Gallery in the left column.
- Select the images from your Media Library to add to the gallery, or upload new images.
- With your images selected, click Create a new gallery.
- Reorder your images and/or add captions if necessary.
- In the right column, find Slider Settings and check the box next to Show gallery as slider.
- More slider options will now appear. Configure your gallery slider, then click Insert gallery.
Videos
Videos will display full-width when inserted into projects.
To prevent a video from display full-width, follow these steps:
- Switch the editor from Visual to Text mode using the tab in the upper right corner.
- Wrap the video URL in a
<div>and anembedshortcode. It will look something like this:
<div>
</div>
More on embedding video.
Content styles
Bailey includes some special content formatting styles to add an extra touch to your projects, posts, and pages.
Run In
The Run In style is intended to place extra emphasis on the first paragraph of content in a project / post / page. See an example.
To add the Run In style to a paragraph:
- In the Visual Editor, place the cursor on the paragraph you would like to change.
- Click the Toolbar Toggle button to reveal the second row of formatting buttons, if it is not already visible.
- Click on the Formats dropdown and choose Run In.
Blockquote
In Bailey, blockquotes are intended to emphasize specific blocks of content, and thus are visually similar to the Run In style. However, when used in projects, they are different from Run Ins in that they will display full-width. See an example.
To convert content into a blockquote:
- In the Visual Editor, place the cursor on the paragraph you would like to change. Or, to wrap multiple paragraphs in a blockquote, highlight all of the content you would like to change.
- Click the Blockquote button in the first row of formatting buttons.
Buttons
Bailey adds a special feature to the Visual Editor that allows you to add a link to your content that looks like a button.

- In the Visual Editor, place the cursor at the position where you would like to insert a button.
- In the first row of formatting buttons, click the Add button button.
- Enter Button text, which will appear on the face of the button.
- Enter the Button URL.
- If you would like a download icon to appear next to the Button text, check the box.
- Click OK.
Project title
A project’s title appears in portfolio archives and on custom portfolio pages, but it does not appear on the individual project view. To show the title text in this view as well, you’ll need to add it to the content editor.
Types and tags
Similar to categories and tags in blog posts, you can add types and tags to projects in Bailey. Types are equivalent to post categories, and Tags are equivalent to, well, tags.
More on using categories and tags.
Featured image
When you add a featured image to a project, it will represent that project in portfolio archives and on custom portfolio pages. It won’t be displayed when viewing the individual project, however. If you’d like the same image to appear there as well, you’ll need to insert it into the content editor, the same as any other image.
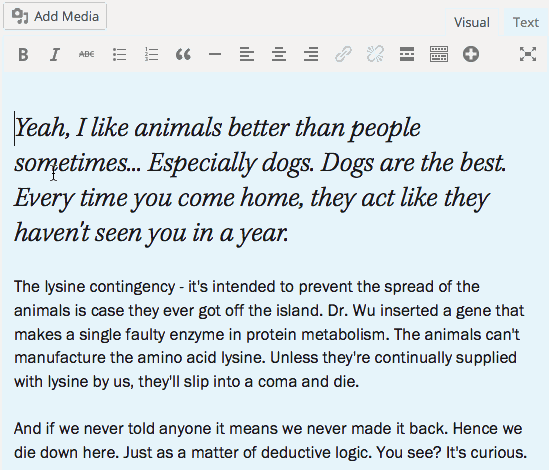
Individual color scheme
Each individual project, post, and page in Bailey can have its own color scheme that overrides the global color scheme. Beneath the content editor is a box labeled Colors where you can specify each one:
- Click Select color.
- Use the picker to choose the right color, or type in the corresponding hex value.
- Clicking elsewhere on the screen will hide the color picker.
- Remove a custom color selection by clicking the Clear button next to the hex input field.
- Once you have chosen your colors, click Update to save your changes and see your new color scheme in the Visual Editor.
Portfolio archives
By default, all of your projects are collected into a Projects archive, which is accessible on your site at yourdomain.com/portfolio. Each of the project types and tags that you create also has an archive. Links to these archives can be added to your site navigation by setting up a custom menu.
On each of these portfolio archives, the projects are arranged in columns. Each project is represented by a featured image, the project title, and a list of the types and tags it has been assigned. Many aspects of this layout are customizable, as detailed below.
See an example portfolio archive.
Archive title
Portfolio archives have titles that correspond to the type or tag that they represent (e.g. “Art” in the example above). However, this title is hidden by default. To show this title, navigate to Portfolio section in the Customizer and check the box to Show archive title.
Archive description
Project type and tag archives can include a description above the layout of projects (no description is possible for the main Projects archive). To add a description to a project type:
- Navigate to Portfolio → Project Types.
- Click on the Type you would like to add a description to.
- Add content to the Description field. Limited HTML is allowed.
- Click Update.
Project types and tags
A project’s types and tags lists can be hidden by navigating to the Portfolio section of the Customizer and unchecking the box to Show project types and tags.
Columns
The number of columns that projects display in can be adjusted between 1 and 3 and are set on the individual Portfolio pages.
To change the number of columns in the portfolio archives, navigate to Portfolio section in the Customizer and choose the desired number of Portfolio Columns.
Overlay style
There are three options in the Portfolio section in the Customizer for the behavior of a project when hovering over / tapping on it:
Frame
This is the default option. An inset border will appear over the project’s featured image, and the project’s title will highlight.
Solid
The entire featured image will be covered by an opaque overlay containing an icon, and the project’s title will highlight.
None
Only the project’s title will highlight.
Image aspect ratio
By default, project featured images are displayed in archives / portfolio pages at the same aspect ratio they were uploaded with. This gives the project layout an organic feel, assuming the featured images have varying aspect ratios. However, in the Portfolio section in the Customizer, you can specify a particular aspect ratio to give the project layout more of a grid appearance. The options are landscape, portrait, and square. The featured images will be cropped to the center in each of these cases.
Custom portfolio pages
Portfolio pages allow you to collect and arrange any number of projects into one view, regardless of which types or tags they’ve been assigned. However, these pages still have the same layout as portfolio archives and are affected by the same Portfolio options in the Customizer.
To create a Portfolio Page:
- Navigate to Pages → Add New.
- Add a title.
- In the Page Attributes box, click the Template dropdown and select Portfolio Template.
- A new box labeled Projects will appear beneath the Page Attributes box.
See an example Portfolio Page.
Managing projects
In the Projects box, there are two sections: Selected Projects lists the projects already added to the current page, and Choose Projects shows available projects that have not yet been added.
In the Choose Projects section, the Recent Projects tab shows the most recently published projects. Clicking on a project title will add it to the list of Selected Projects. If you would like to select a less recent project, switch to the Search tab and begin typing the title of the desired project, and then select it from the list that appears.
In the Selected Projects section, you can click and drag items to change their order. To remove a project from the list, click the “x” on the right edge of the item.
Also in the Projects box is a dropdown for choosing a number of Portfolio Columns. This will override the global Portfolio Columns setting in the Customizer.
Portfolio Page content
Any content added to the editor on a Portfolio Page will appear above the project layout, similar to an archive description.
Configure your blog
Bailey offers simple, yet fully functional blog templates to accompany your portfolio. Below describes the blog’s available features and options.
The blog page (Posts page)
On a new WordPress installation, the front page of your site will show your latest blog posts. If, however, you would like to show a different page as the Front page (like, say a Custom Portfolio Page), you will need to set up a separate page to show your latest posts.
- Navigate to Pages → Add New.
- Add a title, such as “Blog”, and then click Publish.
- In the Customizer, go to the Static Front Page section.
- Switch the Front page displays option to “A static page”.
- Assign a page for the Front page and your newly created “Blog” page for the Posts page.
- Click Save and Publish.
The Main sidebar
This sidebar is a widget area that can be included to the left of the content on the various blog views (Posts page, archives, search results, and single posts) as well as on pages. In the Display section of the Customizer you can check / uncheck the options for Show Main Sidebar to specify which views will include the sidebar. Views that do not have the sidebar enabled with expand to full-width.
This setting can also be overridden for individual posts and pages:
- On the Edit screen, find the Sidebar box.
- Next to Show Main Sidebar are two checkboxes. The second checkbox will be checked or not depending on what has been set for the current view in the Customizer.
- To override the global setting, check the first checkbox. This will enable the second checkbox to be changed.
- Be sure to Update to save your changes.
Note that the Main Sidebar is not available for inclusion on portfolio and project views, which have been designed to focus exclusively on the content they contain.
Post and page features
Like projects, posts and pages can make use of gallery sliders, content styles, and individual color schemes. One notable difference, however, is that features such as sliders, embedded videos, and blockquotes will not be displayed “full-width” on posts and pages because that space is taken up by the sidebar.
Site navigation
Bailey‘s site navigation consists of a vertical “slide-and-push” menu bar that emerges from the right side of the screen when the Menu button in the site header is clicked. Clicking anywhere outside of this menu bar, or a second time on the Menu button will return the bar to its hidden position. The Menu label can be customized in the Navigation section of the Customizer.
The menu on the menu bar will display a list of your site’s pages by default, or you can replace it with a custom menu.
The menu bar also accommodates a Menu Sidebar, which can be configured in the Widgets section of the Customizer.
Site footer
The site footer can either be minimal or expansive, depending on how you configure the options detailed below.
Footer widget areas
In the Footer section of the Customizer, you can specify up to 3 widget areas for your footer. Each widget area is a column, which can then be configured in the Widgets section of the Customizer. These widget columns can be selectively shown only on certain views by checking/unchecking the Show Footer Widgets options. You can also choose “0” to omit the widget columns completely.
Footer text
Any content added to the Footer Text field in the Footer section of the Customizer will appear beneath the footer widgets, but above the social profile links. Limited HTML is allowed along with text in the field.
Using portfolio content without Bailey
If you switch to a different theme after setting up a portfolio with Bailey, the Portfolio admin menu will disappear and you won’t be able to edit or view your projects. However, your project content in this case has not been deleted. In order to reactivate the Portfolio functionality, you will need to install the Jetpack plugin, version 3.1 or above. With this plugin installed and activated, your projects should be accessible once again, although they may not display correctly if the new theme does not support them.
Advanced Customization
Bailey was designed and built to be very flexible and easy to tailor to suit your needs. If there are changes that you would like to make that are not possible through the customization options above, first read through our tutorial on setting up a child theme. Below are further details on a few specific customizations.
Filter hooks
Using filters, rather than directly editing the theme code, is a better way to alter the theme when possible; however, this should still only be done if you are comfortable working with PHP. These filters and the sample code should be placed in your child theme’s functions.php file.
bailey_image_sizes
The bailey_image_sizes filter allows a developer to change or add custom image sizes to the theme. For example, to change the width of a full-width image shown on the single project view to 800px, the following code would work:
function bailey_child_image_sizes( $sizes ) {
    $sizes['bailey_large'] = array( 800, 9999, false );
    return $sizes;
}
add_filter( 'bailey_image_sizes', 'bailey_child_image_sizes' );
After making a change like this, you would need to regenerate the sizes for your existing images with a plugin such as AJAX Thumbnail Rebuild.
Keep in mind that in addition to changing the actual image dimensions, CSS changes may also be necessary for the layout to work correctly.
bailey_read_more_text
The bailey_read_more_text filter allows a developer to change the link text that appears beneath excerpts. For example, the default link text is “Read more”, but a developer could change it to “OMG tell me more!!!” with the following code:
function bailey_child_read_more_text() {
    return 'OMG tell me more!!!';
}
add_filter( 'bailey_read_more_text', 'bailey_child_read_more_text' );
bailey_social_links
The bailey_social_links filter allows a developer to add, remove, reorder, or edit social profile links in the site footer. For instance, to add a link for Last.fm, a developer could add the following code:
function bailey_child_social_links( $services ) {
    $services['last_fm'] = array(
        'title' => 'Last.fm',
        'url'   => 'http://last.fm/user/your-profile-goes-here',
        'class' => 'last_fm',
    );
    return $services;
}
add_filter( 'bailey_social_links', 'bailey_child_social_links' );
Then in the child theme’s style.css file:
.footer-social-links .last_fm a {
    width: 16px;
    background-image: url(path/to/last_fm.png);
}