
Checklist for improving blurry images in WordPress
By team on September 2, 2014
Have you ever wondered why an image looked better before you published it? If you’ve had this experience, managing image quality in WordPress can seem like a frustrating, if not bewildering, endeavor. What’s happening to your images between leaving your hard drive and appearing on the web – and how do they get so blurry?
The good news is that you can often reduce or eliminate image blurring. The bad news is that more than one factor could be contributing to the problem.
First, we’ll go over some reasons you might be seeing blurry images in WordPress. Afterward, we’ll guide you through a checklist for fixing blurry images before publishing them on your website.
Causes of blurry images
Many factors can cause blurry images. Taken alone, each factor usually has a very minor effect on image quality. It’s when they compound that your images appear frustratingly blurry.
- You uploaded a blurry image. Maybe you’re uploading an image from your camera, and you were using a slow shutter speed when you took the picture. It didn’t look blurry on your device’s LCD screen, but the camera shake is obvious now that it’s on the web. Or maybe you’re using an image you enlarged after seeing a smaller version of it elsewhere. Regardless, the image doesn’t look how you want it to.
- Your browser resized the image. A consequence of responsive web design, browsers will resize large images so they can be viewed on smaller screens. Unfortunately, doing so may also reduce image quality in an effort to display all of the content.
- WordPress resized the image. Size reduction often means quality reduction, too. If you deliberately or inadvertently resized an image in WordPress, something you can achieve through the Edit Media page or the WordPress Media Manager, the smaller version of your image may not be as sharp as the original.
There are other reasons your images may be blurry, but these are by far the most common ones we encounter in The Theme Foundry support forums. Now that you know why your images look blurry, let’s go over how you can make them sharp and vibrant again.
Avoiding and improving blurry images
Our checklist begins with fixes you can apply before uploading images to WordPress. We’ll conclude with some strategies for improving the images you’ve already published.
Item #1: Begin with a sharp, color-corrected image.
If you’re adding an image from your own camera, examine it on your desktop computer screen before uploading it to WordPress. Sometimes, images look deceptively sharp on your phone or your camera’s LCD screen, and it’s hard to obtain an accurate representation of their “real” appearance. As you’re looking at the image on your computer screen, ask yourself:
- Does the image appear sharp?
- Is there an inherent blur because the photographer’s hand was shaking when the picture was taken?
- Is there a similar image that may be more suitable?
You should follow a similar process if you’re using an image taken from elsewhere on the web. Make sure you’ve resized the image to the size you’re planning to display on your site (more on that in a moment), and determine whether it’s sufficiently sharp.
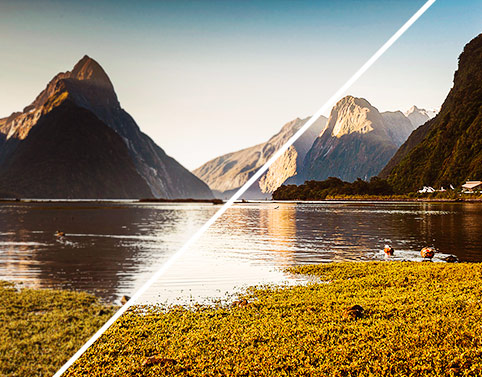
Also be mindful of unbalanced or dull colors. While you can rely on your best judgement to determine whether the colors in an image represent the scene you’re trying to depict, you can also color correct your image using an application like Adobe Photoshop. If you’d like to learn more about color correction (it’s not as hard as you think!), check out this excellent primer from Lifehacker, which teaches how to use image editing tools to arrive at optimal colors.
You can also use the “Auto Color” option in Photoshop to let the application color correct an image for you. Most image editing applications provide some form of auto-correction tools for color.
Item #2 Resize images according to their purpose.
Large images load slowly and give your readers a reason to click away. You don’t want that to happen, which is why you should only add images that are resized to “fit” with your content.
Let’s say you’re adding an image to a blog post. You want to upload a picture you took, but the original file from your camera is enormous. Every time you’ve added large images to WordPress, they’ve looked blurry on your blog. Readers have to click on the image to see the bigger, less blurry version, but it’s usually too large for their screens anyway.
This time, instead of uploading the gargantuan image to WordPress, you should use the scaling feature in an image editor to resize your image to optimal dimensions. The exact pixel width will depend on the width of your content area.
Check out our tutorial on resizing images for WordPress. In that article, we go into much more depth about the benefits of resizing and direct you to some free applications you can use to resize images before uploading them to your site.
Item #3: Still blurry? Try a plugin.
This fix is for images you’ve already published or that you have to publish in spite of their blurriness. If pixelation or color loss is noticeable in a JPEG file you’ve already uploaded, you can use the WP Resized Image Quality plugin to minimize those imperfections.
Basically, this plugin changes the compression level of JPEG images to improve their quality. It can be a last minute panacea if you’re unable to improve your images before uploading them to WordPress.
Item #4 Fix your edges.
The ImageMagick Sharpen Resized Images plugin brings the open source ImageMagick image editing application to your WordPress installation – and it can be a great tool for improving edge sharpness in images you’ve already uploaded.
Even seemingly high quality, color-corrected images can sometimes benefit from a modest sharpness boost. This plugin can make your images “pop” a little more and help you improve some of those “not too blurry, but could be sharper” images you’ve published in the past.
Applying best practices
The first two items in our list – only using high-quality images and resizing prior to uploading – are best practices you should follow strictly. Think of them as integral steps in your publishing process. The sooner you do, the less often you’ll be disappointed by blurry images on your site.
Now you can start publishing beautiful, brilliant images! Go apply the strategies we’ve discussed and let us know if they’re improving image quality.
Enjoy this post? Read more like it in Tutorials.