
Customizing WordPress themes before they’re live
By on October 29, 2014
If you’ve ever switched WordPress themes, you know how frustrating it can be to tweak your site to perfection while it’s live. The whole world can view your changes in real time, not to mention your mistakes. It’s far from ideal, sure, but what choice do you have?
Traditionally, testing and customizing WordPress themes before adding them to live sites required technical proficiency. You needed tools like MAMP, XAMPP, and FTP clients to set up and use a testing environment. And let’s not forget about phpMyAdmin and .htaccess – they came in handy, too, but working with them could be pretty intimidating for non-developer WordPress users.
As we move into 2015, things have changed a little. There still aren’t many ways for the average WordPress user to test and customize new themes before committing to them, but there are some ways.
And if you just want to make modest changes to a new theme or see whether it “fits” with your existing content, WordPress itself may offer all the tools you need right out of the box.
WordPress Customizer
The Customizer helps you do exactly what it claims: customize your theme. It’s been part of the WordPress core since version 3.4 came out in 2012, but the Customizer’s utility has always depended on the extent to which themes use it.
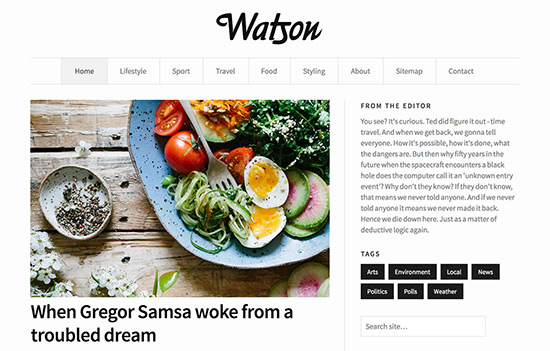
Our free drag-and-drop theme, Make, for example, takes full advantage of the Customizer. Many themes from quality providers also let you use the Customizer to make significant changes. Others don’t.
To view your content inside a new theme and make changes with the Customizer, perform the following steps:
- Upload or install a theme from the “Appearance > Themes” section of WordPress.
- When the theme is uploaded or installed, click the “Live Preview” link at the bottom of the status screen. There is also a “Live Preview” button for each theme on the main “Appearances > Themes” page. Hover over a theme for the button to appear.
- Customizer options appear to the left of your theme preview. Use them to tweak and tinker to your heart’s content.
- When you’re ready to publish, click the “Save and Activate” button at the top of the Customizer.
That’s it! Themes that offer ample support for the Customizer can help less technical WordPress users achieve the look and feel they’re going for – all without making changes to a live site. It’s a beautiful thing.
But while we’re big fans of the Customizer here at The Theme Foundry, we’re under no illusions about its limitations. It is not a replacement for local or online staging environments; here are some reasons why:
- There’s no way to save changes and return to them later. Unlike live staging sites (more on those shortly!) or local staging environments, you can’t save modifications to an as-of-yet unactivated theme, log out of of WordPress, and finish your customizations at a later date. You either have to activate the theme immediately or discard the changes.
- Customizations are limited. If you want to make any changes beyond what the Customizer options allow – and those will vary by theme – you still have to use a child theme and apply the changes to the live site.
- The Live Preview + Customizer functionality is more useful for previews than customizations. Due to the Customizer’s limitations in some themes, viewing your existing content in the container of a new theme may be all you can hope for.
We think using the Customizer with WordPress’s Live Preview functionality is a great way to modify a theme prior to activating it if you’re not comfortable using a staging environment or don’t have access to one.
But what if you’re a bit more confident in your technical prowess and do want to modify a theme in a full-on trial-and-error testing environment? There’s a way to do it without MAMP, XAMPP, import/export, or running database queries, though we’ll caution you: we’re entering uncharted (or at least, minimally charted) WordPress territory.
WP StageCoach
There are basically two kinds of staging environments: a local site that uses your hard drive as a server and an online site that denies access to anyone other than logged in users. Traditionally, both of these options involved a lot of technical adjustments to make the site you built in the staging environment migrate perfectly to the live site.
WP Stagecoach is trying to simplify that process – and the project looks really exciting!
While we’re not going to outright endorse WP Stagecoach (at least not yet), making staging environments more accessible to the general, non-developer WordPress community is definitely a worthy endeavor. WP Stagecoach lets you set up an online staging environment through a simple UI. Then you can add a new theme, customize it to your heart’s content, and import all your hard work into your live site whenever you want. Here’s a video tutorial published by the creator:
As of this writing, WP Stagecoach remains in beta. So while it may or may not be a little buggy, you can use it for free at least until the next release! Some people working with the alpha release reported issues with some plugins, but WP Stagecoach has since published a list of plugins that aren’t compatible.
If you want to give WP Stagecoach a shot, let us know how it works for you!
Web host-provided staging sites
Access to an online staging environment is a major feature of many managed WordPress hosting packages. If you’re planning to test and customize several themes before adding them to a live site, you might want to invest in managed WordPress hosting.
Here are a few managed WordPress hosting providers that include staging areas in at least one of their packages for personal or small business websites:
While each host’s staging site arrangement will differ somewhat, the basic idea is the same: Via a relatively simple UI, you can create a separate, private WordPress installation that imports all of your existing content. After adding a new theme to the separate WordPress site and modding the design to your liking, you then migrate all of the changes – and the database – into your live WordPress site.
Besides access to the staging sites themselves, another huge benefit of managed WordPress hosting is that you’ll have a support technician at your beck and call in the event you encounter anything confusing. And if your hosting provider has its documentation in order, you can quickly address any “how to” questions about using the staging environment.
Additional resources
In case you haven’t noticed, every option we’ve discussed for customizing WordPress themes prior to publishing is, in some way or another, imperfect:
- Relying on the Customizer limits you to options within the Customizer interface, and you can’t save your work to finish at a later time.
- WP Stagecoach is still in beta, so you may run into issues depending on the plugins you’re using.
- Separate staging areas are only available through certain managed WordPress hosting providers. Not all publishers are in a position to pay five times as much for hosting just so they gain access to staging sites.
Without getting familiar with the technical nuances of offline development, non-technical WordPress users are effectively barred from the possibility of customizing their themes before publishing the changes. We’re trying to address the issue with Make, which accommodates heavy customization via the Customizer, and the folks behind WP Stagecoach, in their own way, are working to change things, too. Eventually, the WordPress community will figure this out!
In the meantime – and if you’re comfortable learning more about the technical side of WordPress testing – here are some resources that can help you test changes before pushing them to your live site:
- Chris Lema’s guide to staging environments: There are a few site staging solutions that straddle the ease of WP Stagecoach’s one-click interface and the intricacies of migrating a local WordPress installation. Chris goes over some of the best ones and explains how they work.
- Raelene Wilson’s MAMP/WordPress tutorial: If you think you’re ready to test and customize a theme in a local WordPress environment, check out this tutorial on MAMP, which stands for “Mac OS X, Apache, MySQL, PHP.” MAMP, as its name implies, was originally developed for Mac, but there’s a Windows version, too.
- Tom Ewer’s tutorials on creating and uploading local WordPress sites with XAMPP: XAMPP is similar to MAMP but a bit more versatile (the second “P” stand for “Perl”). For creating a WordPress sandbox, the experience will be more or less the same as with MAMP. These overviews will show you how to use XAMPP effectively.
- Varying Vagrant Vagrants (VVV): A WordPress-focused configuration of a Vagrant environment, VVV lets you build, test, and customize themes in a virtual machine sandbox. Basically, VVV provides a much more true-to-life WordPress experience than do local development environments.
If you know of other technically undemanding ways to customize WordPress themes before they go live, tell us about them! We’re always looking for high quality tools and resources that will help new WordPress users get the most out of their experience.
Enjoy this post? Read more like it in From the workshop.