Archive of posts with the make-plus topic
In Make Plus, you’ll find an option to add section IDs or classes in the Configure panel of each builder section. These settings make it easy to add custom styling to your individual builder sections, or create internal links for one-page sites.
Link to builder sections with section IDs
Use the section ID field in each builder section to create links to various sections on a one-page site or direct visitors to a particular section on that page.
For example, if you have a section on your about page (your-site.com/about) for testimonials, you might add a section id called testimonials.
The link to this section would look like this — your-site.com/about/#testimonials and you would add it to your menus by using the Custom Link function:
For more about creating and using custom menus in WordPress, see this page in the WordPress Codex.
Using section classes to apply custom CSS styles
Adding classes to your builder sections makes it easy to apply custom CSS styles on a per-section basis. The easiest way is to insert your custom styles to Additional CSS tab in Customizer.
In case you prefer to edit a real style.css file, make sure you have a child theme of your active theme activated. You can find a guide to Make’s child theme here.
We have tutorials to get you started with theme customizations in our Help Center:
The page builder’s Panels section is available if you have the premium Make Plus plugin activated.
Panels and accordion tabs are a great way to display text-heavy information on pages — like FAQ sections or service information. By using a Panels section, you can help reel in unweildy long pages on your site!
Add a Panels section
In the builder menu, hover over the Panels icon and click  to add this section to your page.
Configure the section
Click  in the section header to:
- Add a section title. This displays above the section if it is set.
- Select to display content in an Accordion or Tabs.
- Choose to set the section height to the largest panel or scale to the current panel.
- Set the background image or color.
- Add a HTML section ID or class.
- Check to remove the space below the section.
Configure an individual panel
Click to add a new panel. For each panel you can:
- Set a panel title.
- Add content to the panel. Click
 or the blank area of the panel to open the content editor. Once a panel has content, the icon will change to
  .
.
Reorder an individual panel
To rearrange the order of the panels, click and hold the double dotted border at the top of a panel. Drag the panel to a new location and release.
Delete an individual panel
To remove a panel, click  in the corner of the panel.
Want to change just one thing to that one page? With Make Plus installed, you can use the Layout Settings to override the global options configured in the Content & Layout panel for individual posts and pages.
Page Options
On the Add New Page or Edit Page screen, click the Layout Settings tab to view the settings. (If the Layout Settings tab isn’t visible, click Screen Options in the upper right side of the Edit Page screen and click the checkbox beside it.)
All of the options below are available in the Default Template, but the Page Builder template offers fewer per-page options.
Under Layout Settings, the link icon indicates whether the option is linked to the global settings you’ve chosen in the Customizer. To override, click the link icon to unlink the option, then check the boxes to override global settings for:
- Header, Footer, Sidebars: Hide the header and footer and display a left or right sidebar on page.
- Padding: Remove padding below header and above footer.
- Featured Images: Set the style for displaying the featured image. Post header will display the image above the post title. Thumbnail will display the image using the thumbnail dimensions (defaults to 150×150) below the post title and floated left in the content. None will cause the thumbnail not to be displayed.
- Post Date: Display options are Absolute (as in “October 22, 2014”), Relative (to today’s date, as in “1 Week Ago”), or None.
- Post Date Location: Control where the date displays: Top (above your entry title), Before content (below your entry title but above the content), or Post Footer (below your content with the rest of your meta data).
- Post Author: Set the display style for the author byline. With avatar displays a circular image next to the byline. Without avatar displays only the byline. None hides the author byline completely.
- Comment Count: Display the number of comments on each post With icon, With text, or None.
- Breadcrumbs: Display Yoast SEO breadcrumbs on page (must have Yoast SEO plugin installed).
Post Options
On the Add New Post or Edit Post screen, click the Layout Settings tab to view the settings. (If the Layout Settings tab isn’t visible, click Screen Options in the upper right side of the Edit Page screen and click the checkbox beside it.)
Under Layout Settings, check the boxes to override global settings for:
- Header, Footer, Sidebars: Hide the header and footer and display a left or right sidebar on page.
- Featured Images: Set the style for displaying the featured image. Post header will display the image above the post title. Thumbnail will display the image using the thumbnail dimensions (defaults to 150×150) below the post title and floated left in the content. None will cause the thumbnail not to be displayed.
- Featured Images Alignment: Align your images center, left, or right.
- Post Date: Display options are Absolute (as in “October 22, 2014”), Relative (to today’s date, as in “1 Week Ago”), or None.
- Post Date Location: Control where the date displays: Top (above your entry title), Before content (below your entry title but above the content), or Post Footer (below your content with the rest of your meta data).
- Post Author: Set the display style for the author byline. With avatar displays a circular image next to the byline. Without avatar displays only the byline. None hides the author byline completely.
- Post Author Location: Control where the author displays: Top (above your entry title), Before content (below your entry title but above the content), or Post Footer (below your content with the rest of your meta data).
- Post Meta: Choose whether to Show categories and Show tags on your post.
- Comment Count: Display the number of comments on each post With icon, With text, or None.
- Breadcrumbs: Display Yoast SEO breadcrumbs on post (must have Yoast SEO plugin installed).
The page builder’s Downloads section is available if you have both the Easy Digital Downloads plugin and the premium Make Plus plugin activated.
If you’re selling eBooks or albums, you’ll love using Easy Digital Downloads + our Downloads section to show off your awesome work for sale.
The section is meant to display your EDD downloads in a grid, with a variety of filtering and display options. Let’s get started!
Add a Downloads section
In the builder menu, hover over the Downloads icon and click to add this section to your page.
Configure the section
Click in the section header to:
- Add a section title. This displays above the section if it is set.
- Check to remove the space below the section.
Configure the downloads
- From: Choose to display downloads from all categories and tags or a specific one.
- Sort: Choose the order to in which to display your downloads.
- Columns: The grid can have between 1 and 4 columns.
- Number to show: Specify how many downloads to show in the grid. Setting this number to
-1 will show all available downloads that meet the criteria.
- Display: Use the checkboxes to specify which information to display for each of the downloads.
- Details: Choose how much of the download description to show within the grid.
What better way to feature the products you have for sale than displaying a selection of them on your builder pages?
If you have both the WooCommerce plugin and the premium Make Plus plugin activated, the page builder’s Products section allows you to do just that.
Adding a Products section to any builder page will display your WooCommerce products in a grid, with a variety of filtering and display options.
Add a Products section
In the builder menu, hover over the Products icon and click to add this section to your page.
Configure the section
Click in the section header to:
- Add a section title. This displays above the section if it is set.
- Check to remove the space below the section.
Configure the products
- Show: Choose between All products, Featured products, and Sale products. Check the WooCommerce documentation for more information on setting up Featured and Sale products.
- From: Choose a specific product category or tag from which to display products.
- Sort: Choose the order to in which to display your products. Check the WooCommerce documentation for more information on these sorting options.
- Columns: The product grid can have between 1 and 4 columns.
- Number to show: Specify how many products to show in the grid. Setting this number to
-1 will show all available products that meet the criteria.
- Display: Use the checkboxes to specify which information to display for each of the products.
With Make Plus installed, the page builder’s Post Lists section shows off your selected posts in grid-based columns. You can add featured images, show the excerpt, display the date, and more — all by configuring the section.
Add a Posts List section
In the builder menu, hover over the Posts List icon and click to add this section to your page.
Configure the section
Click in the section header to:
- Add a section title. This displays above the Post List section if it is set.
- Add a HTML section ID or class.
- Check to remove the space below the section.
Configure the posts
- Type: Choose which post type to display. Posts and Pages are the default options, but if you have installed plugins that add other post types, these will be listed here as well.
- From: Choose to display posts from all categories and tags or a specific one, or the child pages of a specific post/page.
- Keyword: If used, only the posts that contain the entered keyword/phrase will be shown.
- Sort: Choose the order to in which to display your posts.
- Number to show: Specify how many posts to show in the grid. Setting this number to
-1 will show all available posts that meet the criteria.
- Item offset: If used, the posts list will skip the number of posts entered. A value of
2, for example, will skip the first two posts and begin your posts list with the third post.
- Columns: The posts grid can have between 1 and 4 columns.
- Display: Use the checkboxes to specify which information to display for each of the posts in your Posts List.
- Show featured image: Choose if and where the post featured image displays.
- Image aspect ratio: Choose to display the featured image in landscape, portrait, or square size.
- Excerpt: Check to display the post or page excerpt.
- Excerpt length (words): Set the number of words to show in the post or page excerpt.
With Make Plus active, any column in a Content section can be converted into a widget area on your page. This means you can include content you might usually find in a theme sidebar of footer right in your page!
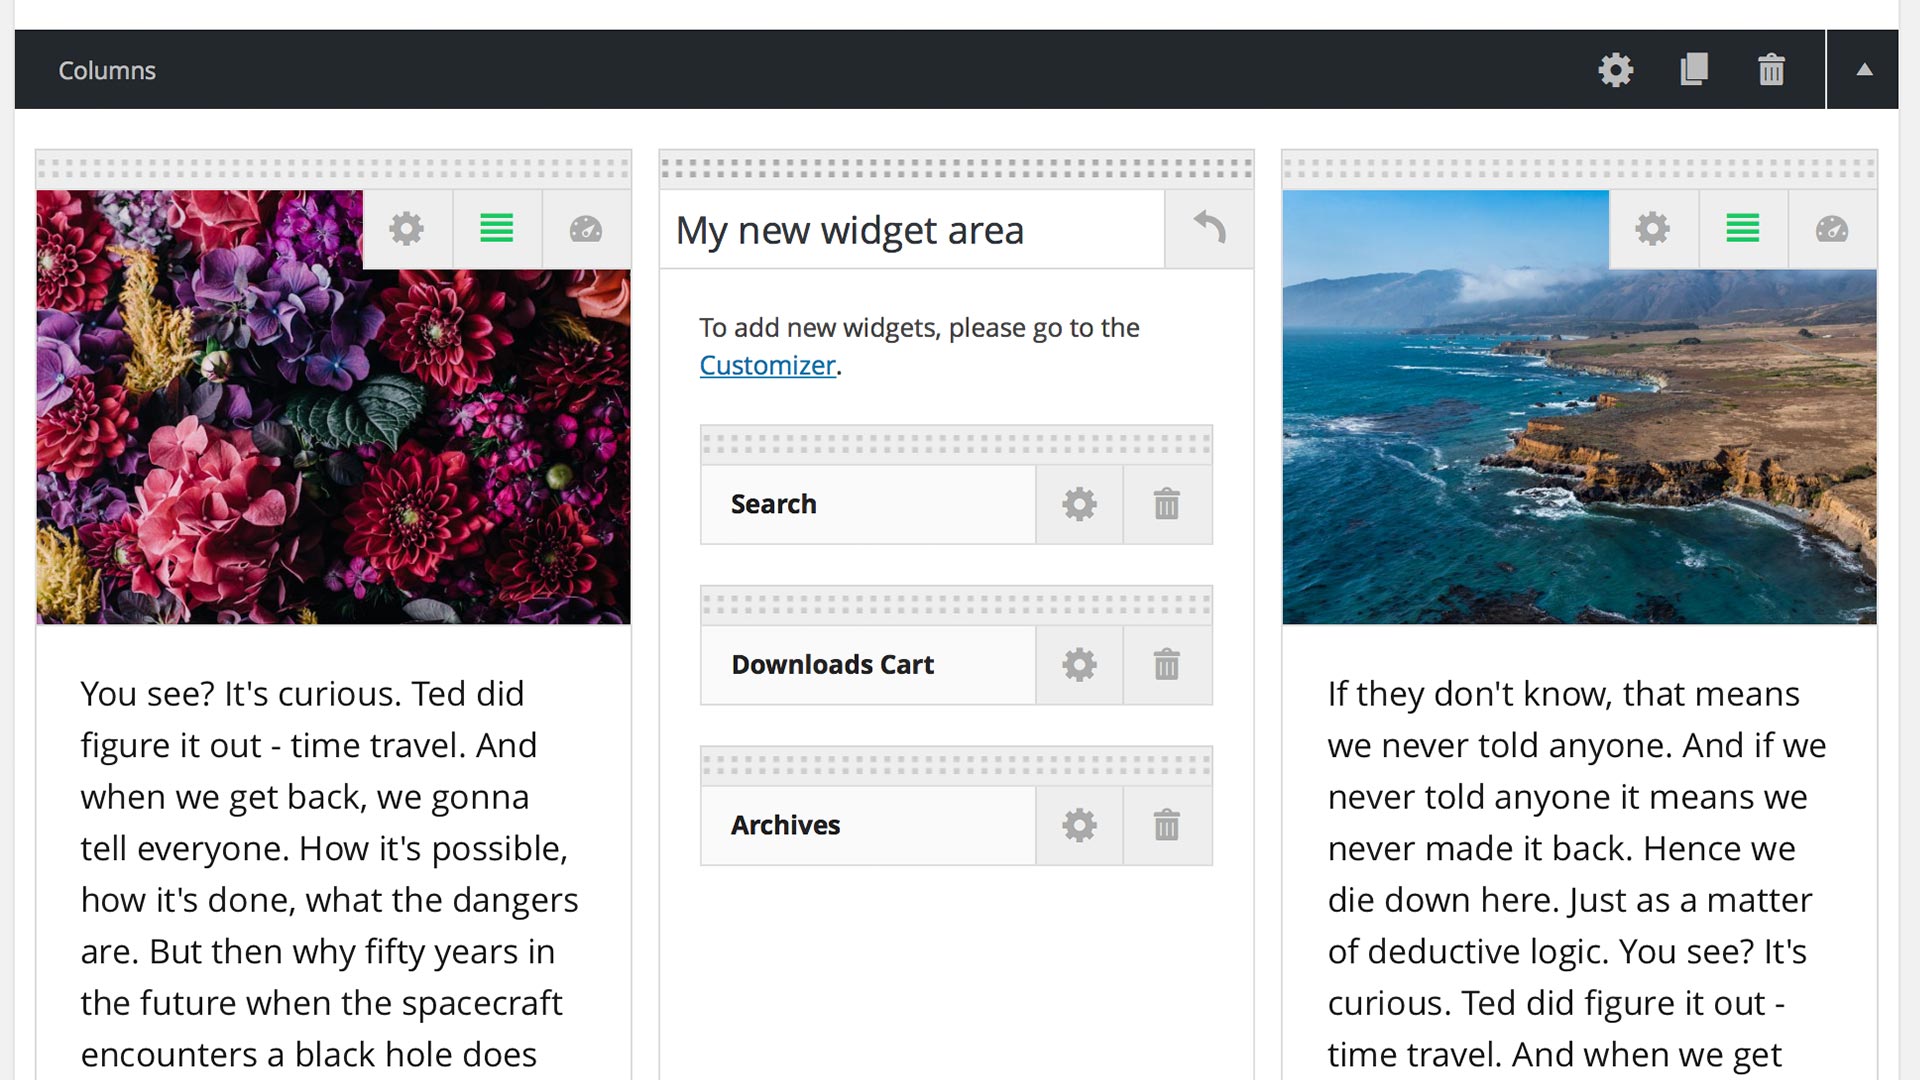
Add a widget area
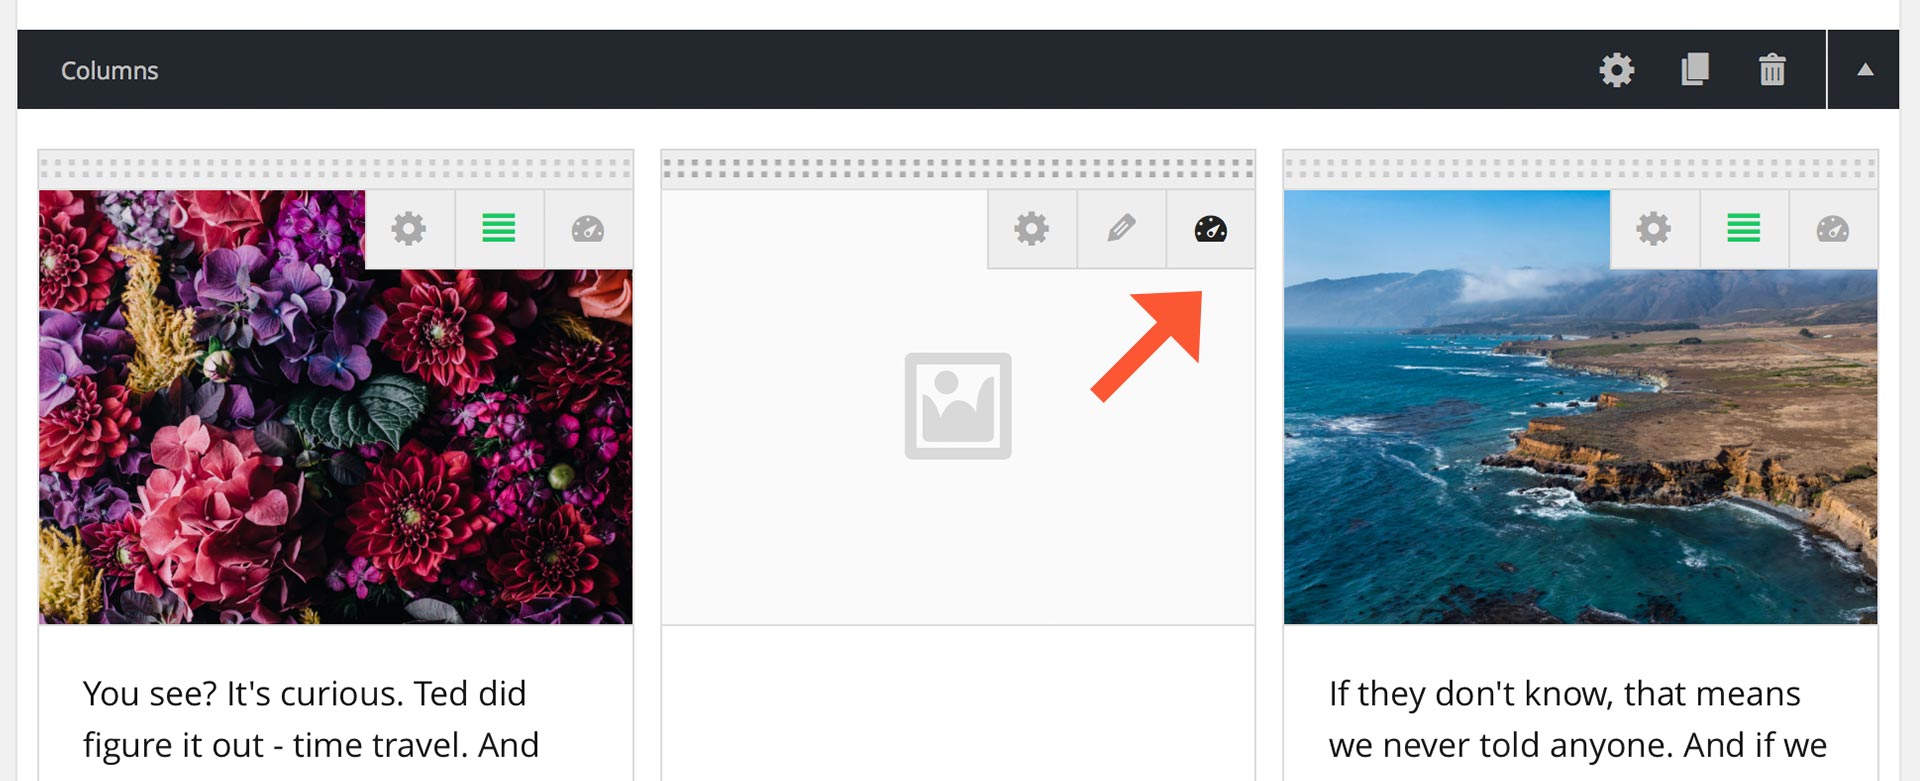
- Set up a Content section in the page builder.
- Convert a column to a widget area by clicking
 in the upper right corner of the column.
- Give the widget area a descriptive name so that it’s easy to identify in the WordPress Customizer and Widgets screens. (This name will not appear on the rendered page.)
- Save the widget area by publishing or updating the page.
Add individual widgets
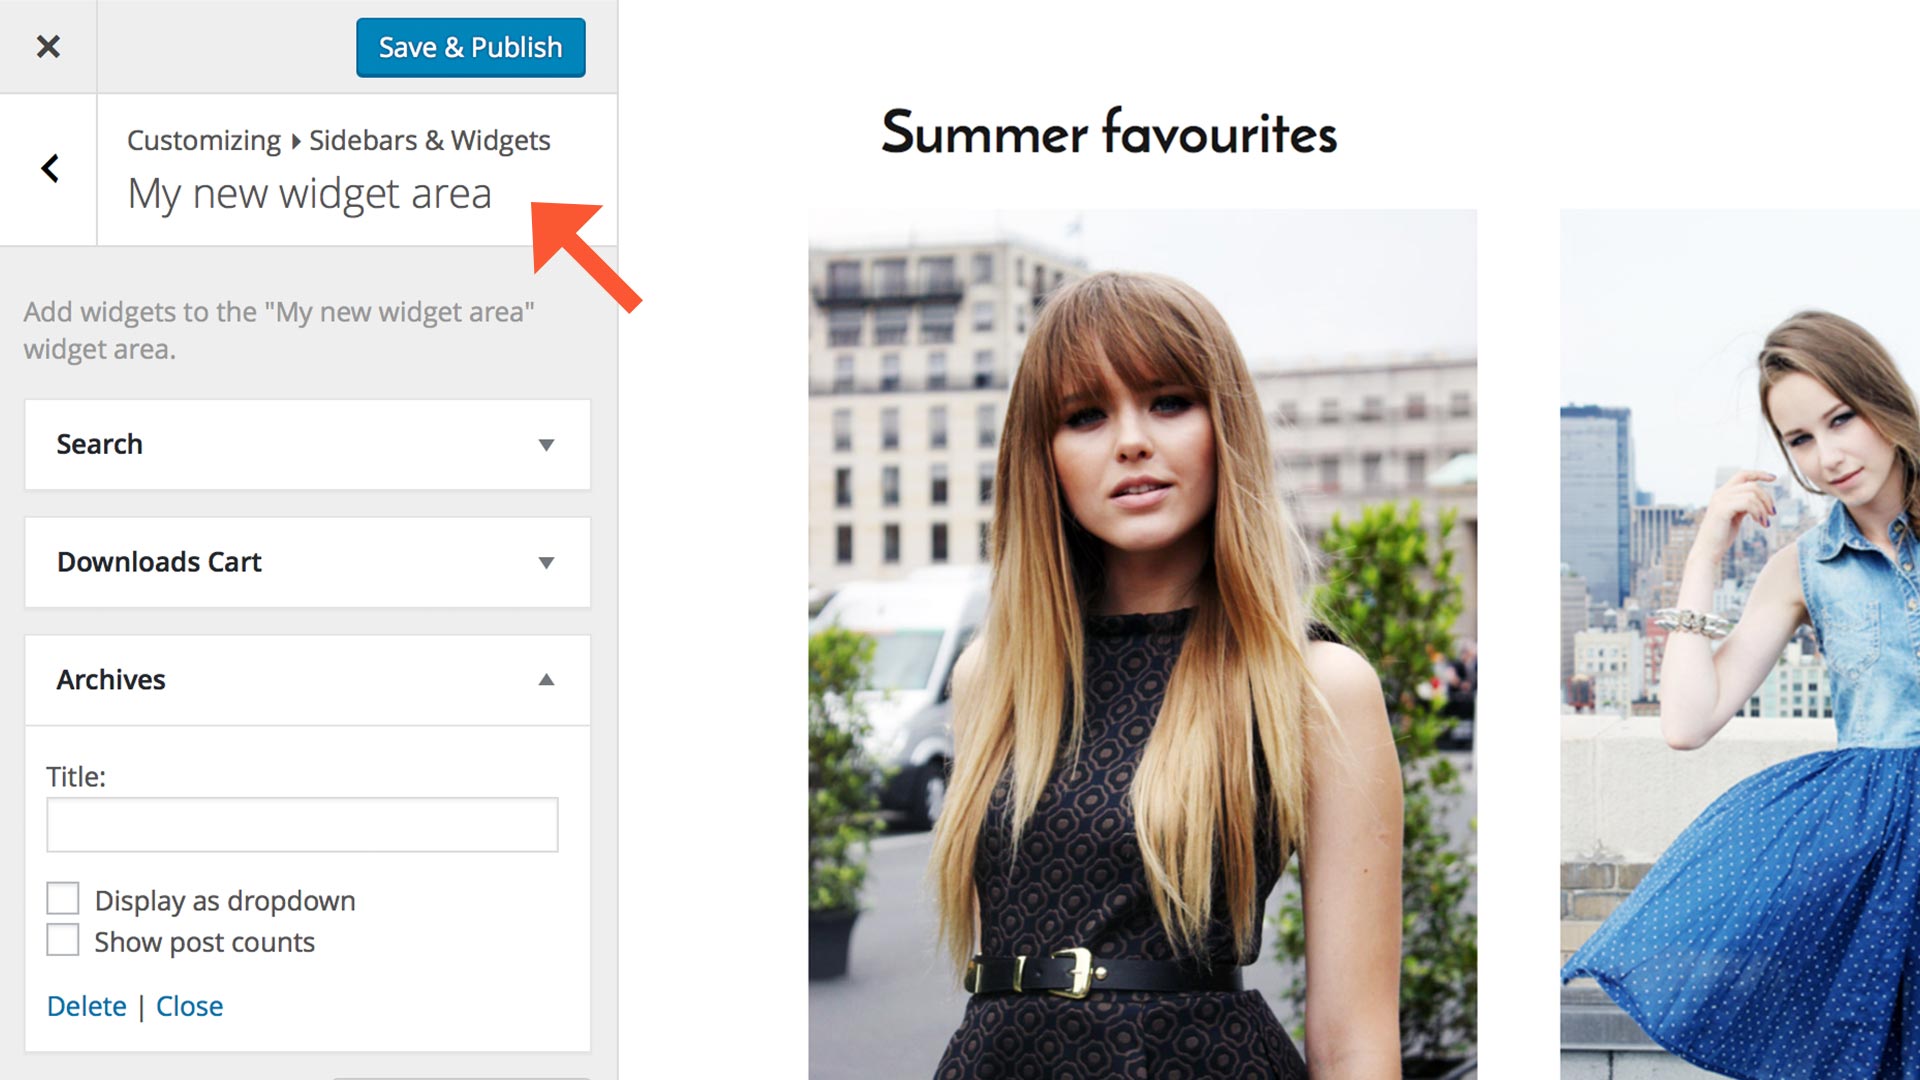
- After the page has been saved, click the Customizer link in the empty widget area.
- On the Customizer screen, click the Sidebars & Widgets panel.
- Find the widget area you just created and add widgets.
- When you’re finished, save your changes by clicking Save and Publish.
- Click X in the upper left corner of the Customizer to close the Customizer and return to your builder page.
Configure an individual widget
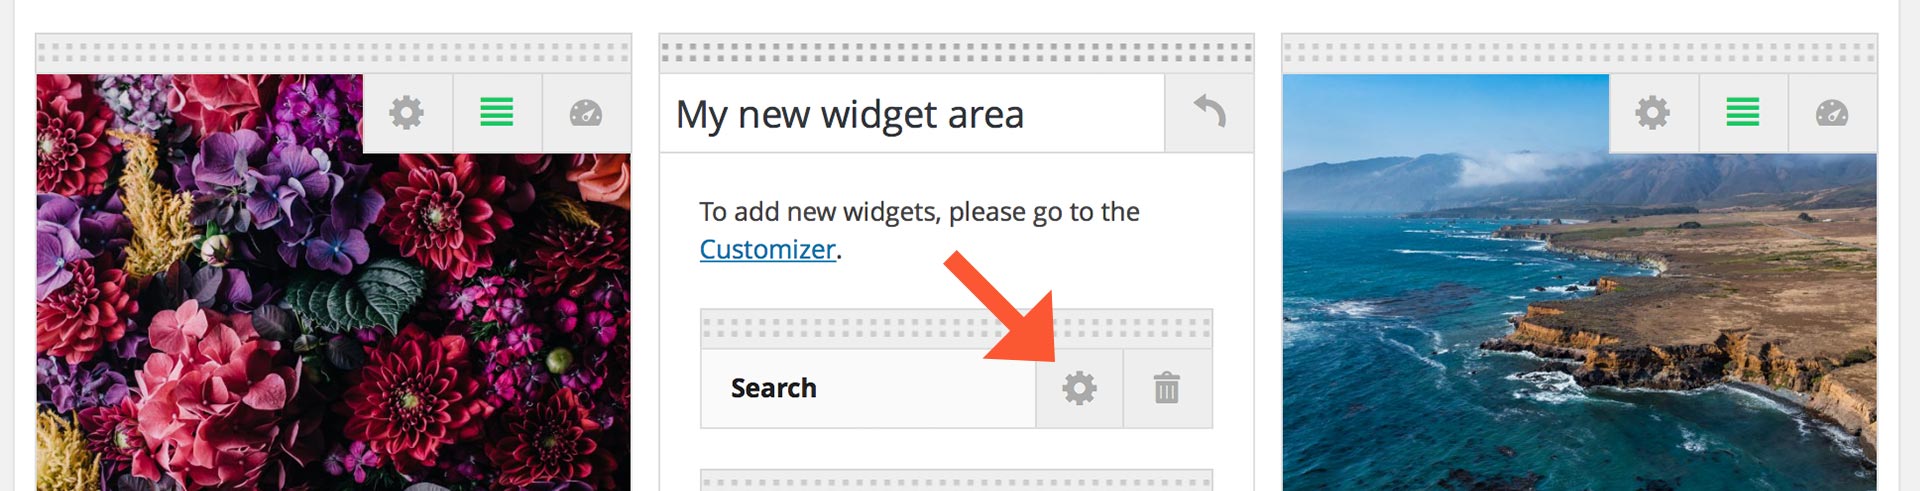
- Click to open a window with the widget’s options.
- When finished, click Done to close the window.
Reorder an individual widget
- Click and hold on the dotted bar at the top of the widget.
- Drag the widget to a new position. A box with a dashed border indicates where the widget will be when you release the mouse button.
Delete an individual widget
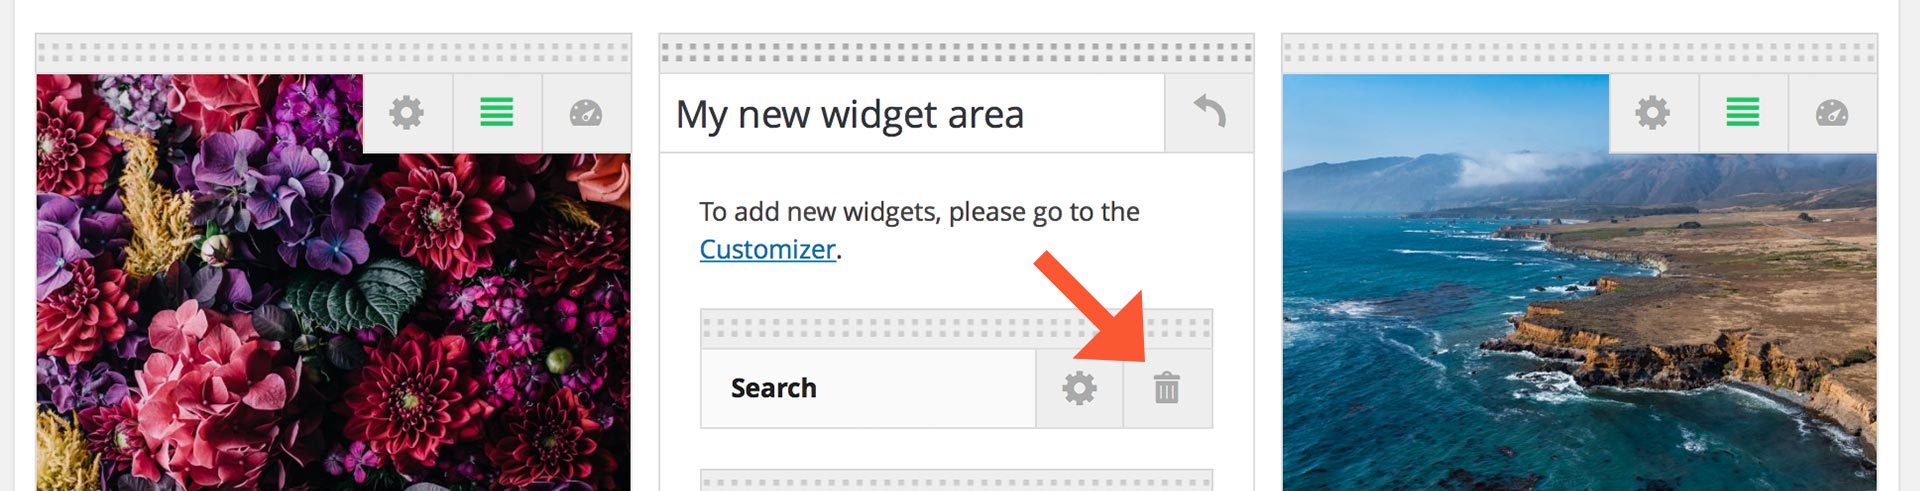
Click to remove a widget from the widget area.
Remove a widget area

To switch back to a regular column, simply click  at the top of the widget area.
Make Plus is our companion plugin for Make. By combining Make with Make Plus, our already outrageously flexible site builder becomes a powerhouse ? for small business.
Let’s get you started with Make Plus. It’ll take you just 90 seconds to install. Promise.
Download and install Make Plus
- To get the compressed (zipped) file of the latest version of Make Plus, sign into your account, head over to Downloads and download Make Plus (install as a plugin).
- Back in your dashboard, head to Plugins and click Add New.
- Click Browse to choose the file you just downloaded, then click Install Now.
- Once it is installed, click Activate.
Authorize Make Plus to stay updated
We ship code updates almost as often as we make bad jokes. So be sure authorize to stay updated — With Make Plus, not our jokes. It’s kind of important.
- Navigate to Tools ➝ Updater API Key
- Request a registration key using the email address associated with your Theme Foundry account
- Enter your registration key
- Click Register